
Main Courses
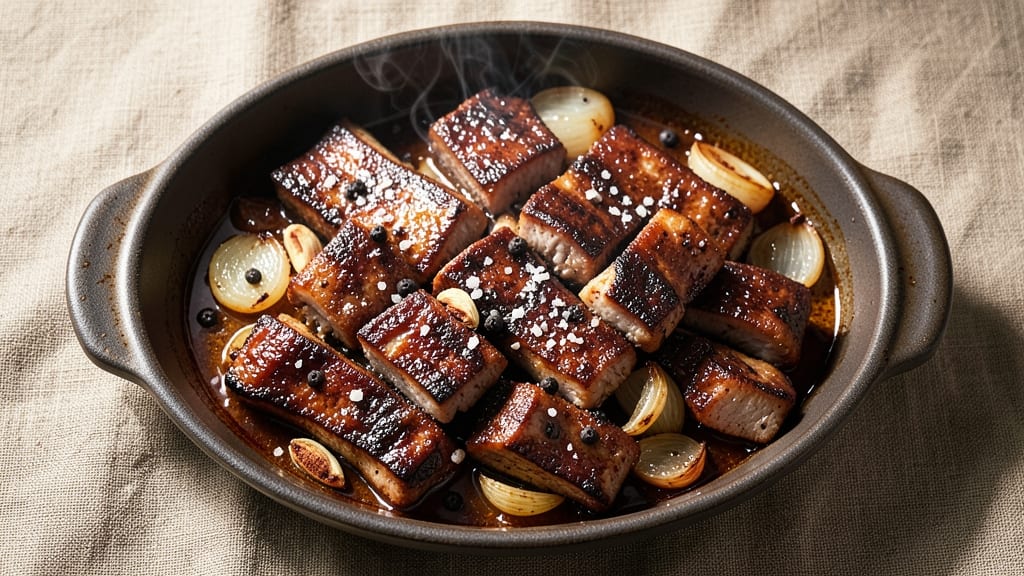
This boneless pork ribs pressure cooker recipe transforms tough cuts into shatter-tender perfection in just 60 minutes—no babysitting required. I developed this method after years of testing pressure cooker techniques, and it consistently delivers restaurant-quality results without the hours of slow cooking.
The secret lies in the right seasoning blend and precise cooking time that breaks down collagen without overcooking.
What sets this recipe apart is how it handles boneless pork ribs specifically—cutting cooking time dramatically while preserving moisture and flavor. You'll start with a simple dry rub of spices that penetrates the meat, followed by a quick sear in the pressure cooker to lock in juices.
The high-pressure environment does all the work while you move on to other tasks, returning to find ribs that practically fall apart at the touch.
The result is fall-off-the-bone tender pork ribs with a caramelized exterior and juicy interior that stays moist. Each bite delivers perfect balance between savory seasoning and natural pork flavor, making this an ideal weeknight dinner or meal prep solution.
The pressure cooker method also means minimal cleanup—just one pot to handle from start to finish.
Serve these ribs with classic sides like garlic mashed potatoes or a crisp green salad to round out the meal. The recipe scales perfectly for feeding a crowd or meal prepping for the week. Ready to master this game-changing technique? Let's get started with the foolproof instructions that follow.
Ingredients for boneless pork ribs pressure cooker
Precision-cut pork ribs paired with aromatic spices and pressure-cooker magic for restaurant-quality tenderness.
| Ingredient | Amount | Notes |
|---|---|---|
| Boneless Pork Ribs 🍖 | 2 lb | Cut into 2-inch chunks |
| Yellow Onion 🧅 | 1 whole | Large, sliced into 1/2-inch pieces |
| Garlic Cloves 🧄 | 6 cloves | Minced, fresh preferred |
| Kosher Salt 🧂 | 1 ½ tbsp | Diamond Crystal preferred |
| Black Peppercorns 🌶️ | 1 tsp | Freshly ground, coarse |
| Smoked Paprika 🌶️ | 1 tbsp | High-quality, not pre-mixed |
| Brown Sugar 🍯 | 1 tbsp | Light or dark, packed |
| Apple Cider Vinegar 🍎 | 2 tbsp | Bragg preferred for quality |
| Olive Oil 🫒 | 1 tbsp | Extra-virgin, for searing |
| Beef Broth 🥄 | 1 cup | Low-sodium, high-quality |
| Fresh Rosemary 🌿 | 1 tbsp | Chopped, fresh preferred |
| Fresh Thyme 🌿 | 1 tsp | Leaves only, chopped |
| Worcestershire Sauce 🍶 | 1 tbsp | Vegan if needed |
The boneless pork ribs are the star, so source them from a butcher or quality meat counter—look for well-marbled cuts that will yield maximum tenderness. Costco or Whole Foods often carry excellent pre-cut boneless pork ribs, but if buying whole, have the butcher remove the bones and trim excess fat. The ribs should feel firm but yield slightly to pressure, indicating proper freshness. For the spices, Penzeys Spices or local bulk bins offer the freshest, most flavorful options—smoked paprika and fresh herbs are non-negotiable for that restaurant-quality depth. If using dried herbs, reduce to one-third the amount of fresh, but fresh is always superior here.
No smoked paprika? Substitute with a mix of regular paprika and a pinch of liquid smoke—just be cautious, as liquid smoke can overpower easily. Fresh herbs unavailable? Dried rosemary and thyme work at one-third the quantity, but the flavor won't be as vibrant. For the Worcestershire sauce, Lea & Perrins is the gold standard, but any quality brand will suffice. The beef broth should be low-sodium to avoid over-salting the ribs, and store-bought versions like Kitchen Basics or homemade reduced broth both work well. The apple cider vinegar adds brightness—Bragg is my go-to for its tangy punch, but any organic brand will do.
Prep the ribs ahead of time by cutting them into even 2-inch chunks for consistent cooking. Store them in an airtight container in the fridge for up to 2 days or freeze for 3 months—they reheat beautifully. The dry rub ingredients can be mixed in a small bowl and stored in the fridge for 1 week in an airtight container. When ready to cook, simply toss the ribs in the rub and let them sit at room temperature for 15-20 minutes before pressure cooking. This ensures even seasoning and optimal tenderness. Leftovers keep for 4 days in the fridge and freeze well for up to 3 months—perfect for meal prep.
Why You'll Love This Recipe
- No-Chop Nightmare: The pressure cooker handles all the work—just toss in the ribs, onion, and garlic whole. No dicing, no mincing, no mess. I swear by this when I’m too tired to even think about prep.
- Garlic Bomb Flavor: That crushed garlic and onion sitting right on top of the ribs? It steams into the meat, creating layers of savory depth. The salt and pepper do the rest—simple, but ridiculously good once the pressure releases.
- Leftovers? More Like Leftovers: Between us, this recipe makes enough for dinner and lunch. The ribs stay tender for days, and I’ve reheated them in the microwave or skillet without losing a bite. Honestly, I make it twice in one week just to have extras.
- Budget-Friendly Feast: Boneless pork ribs are cheaper than you’d think, and this method turns them into a hearty meal without breaking the bank. One batch feeds four, and the leftovers stretch even further—perfect for when grocery money’s tight.
Step-by-step instructions for pressure cooker boneless pork ribs
Here's the method to achieve melt-in-your-mouth pork ribs with minimal effort and maximum flavor.
Prepare the Ribs and Seasoning
Cut the 2 lb boneless pork ribs into 2-inch chunks for even cooking. Pat them dry with paper towels—this helps the seasoning adhere and creates a better sear later. In a large bowl, combine the 1.5 tbsp kosher salt, 1 tsp freshly ground black peppercorns, 1 tbsp smoked paprika, and 1 tbsp packed brown sugar. Rub this mixture generously over all sides of the ribs, pressing it into the meat so it doesn't fall off during cooking.
Let the seasoned ribs sit at room temperature for 15 minutes while you prepare the aromatics. This brief resting period ensures more even cooking. I like to use Diamond Crystal kosher salt here—it dissolves perfectly and enhances flavor without overpowering the meat.
Sear the Ribs for Depth of Flavor
Heat the 1 tbsp extra-virgin olive oil in a large skillet over medium-high heat until shimmering. Working in batches if needed, sear the ribs for 2-3 minutes per side until they develop a deep golden-brown crust. This step is crucial—it locks in juices and creates that restaurant-quality caramelization that elevates the dish.
As you sear, keep the heat steady but not smoking. You want the oil to remain hot enough to create that perfect crust without burning the seasoning. Transfer the seared ribs to a plate and set aside temporarily—you'll add them to the pressure cooker shortly.
Sauté Aromatics and Deglaze
In the same skillet (no need to clean it—the browned bits are flavor gold), add the sliced 1 whole yellow onion and cook for 4-5 minutes until softened. Add the 6 minced garlic cloves and cook for another 30 seconds until fragrant. Pour in the 2 tbsp apple cider vinegar and scrape up all those delicious browned bits from the bottom of the pan with a wooden spoon.
This deglazing step captures all the meaty flavors that would otherwise go down the drain. The vinegar also helps tenderize the ribs slightly and adds a bright acidity that balances the richness. Let the mixture simmer for 1 minute until the vinegar reduces slightly and the onions are tender.
Pressure Cook to Perfect Tenderness
Transfer the seared ribs and onion-garlic mixture to your 6-quart pressure cooker. Add the 1 cup low-sodium beef broth, 1 tbsp chopped fresh rosemary, 1 tsp chopped fresh thyme, and 1 tbsp Worcestershire sauce. Stir gently to combine all ingredients.
Seal the pressure cooker and cook on high pressure for 25 minutes. The ribs should be fork-tender with no resistance when pierced. If you're using an electric pressure cooker, make sure the valve is set to sealing position before starting. Never skip this step—proper sealing prevents dangerous pressure buildup.
Rest and Serve with Sauce
Once the cooking time is complete, allow the pressure to release naturally for 10 minutes, then quick-release any remaining pressure. Carefully open the lid and transfer the ribs to a serving platter. The natural juices will have redistributed during the resting period, ensuring each bite is moist and flavorful.
For serving, you can either leave the ribs in the sauce or transfer them to a plate and spoon the reduced sauce over the top. The ribs should be so tender they practically fall apart with a gentle touch. Garnish with additional fresh rosemary if desired, and serve immediately with crusty bread or roasted vegetables to soak up all that delicious sauce.
Pro Tips For Making Boneless Pork Ribs Pressure Cooker
- Trim the Fat First: Cut off any thick fat layers before cooking—pressure cookers trap moisture, and excess fat makes the ribs greasy instead of tender. I learned this the hard way when my first batch turned out slick and unevenly cooked.
- Sear in Batches: Crowding the pot ruins the crust, so work in 2-3 layers if needed. A quick sear in a skillet before pressure cooking locks in flavor, but don’t rush—golden brown takes 2-3 minutes per side.
- Skip the Overcrowded Pot: Stack ribs vertically if your pressure cooker’s too small—this lets steam circulate instead of turning them into soggy logs. After burning three batches, I finally figured out that tight packing = uneven cooking.
- Add Aromatics Last: Toss chopped onion and garlic cloves after sealing the lid—their juices release later, infusing the ribs longer. My grandmother swore by this, and she was right: the flavor’s deeper when they cook in the steam, not the initial sear.
Creative variations of these flavors
Spicy Asian Fusion
Transform these ribs into a bold Asian-inspired dish by swapping the dry rub for a marinade of 2 tbsp soy sauce, 1 tbsp rice vinegar, 1 tbsp grated ginger, 1 tbsp minced garlic, 1 tbsp sesame oil, 1 tbsp gochujang, and 1 tsp sugar.
Marinate the ribs for 30 minutes before pressure cooking. After the 25-minute cook time, finish with a quick pan sauce of 1 tbsp cornstarch mixed with 2 tbsp water, 1 tbsp hoisin sauce, and 1 tsp sriracha.
Toss everything together for sticky, spicy ribs that scream Korean BBQ vibes. 🌶️
Sweet BBQ Glaze
For a Southern-inspired twist, replace the brown sugar in the dry rub with 1 tbsp maple syrup and add 1 tsp ground cumin for depth.
After pressure cooking, simmer the ribs in a sauce made from ½ cup BBQ sauce (I love Sweet Baby Ray's), 2 tbsp apple cider vinegar, and 1 tbsp honey for 5 minutes until glossy. The glaze caramelizes beautifully, creating a sticky, sweet contrast to the savory meat.
Serve with pickled jalapeños for a tangy kick. 🍯
Herb-Crusted Mediterranean
Give your ribs a fresh twist by coating them in a mix of 1 tbsp dried oregano, 1 tbsp dried thyme, 1 tsp ground coriander, and ½ tsp cinnamon before pressure cooking.
After cooking, brush the ribs with a sauce of 2 tbsp tahini, 1 tbsp lemon juice, 1 minced garlic clove, and 1 tbsp water. Garnish with chopped kalamata olives and feta cheese crumbles for a Mediterranean-inspired dish that’s bright and herby.
This variation works beautifully with warm pita bread. 🌿
Smoky Coffee Rub
For a deep, complex flavor profile, mix 1 tbsp instant coffee granules into the dry rub along with the smoked paprika. The coffee enhances the meatiness of the pork while adding a subtle bitterness that balances the sweetness.
After pressure cooking, serve the ribs with a side of chocolate-dipped strawberries or a dark chocolate mousse to complement the coffee notes. This pairing is unexpected but absolutely delicious—perfect for a special dinner. ☕
Tangy Mustard Sauce
Swap the Worcestershire sauce for 2 tbsp Dijon mustard and add 1 tbsp apple cider vinegar to the pressure cooker liquid. After cooking, reduce the sauce by simmering it for 3-4 minutes**> until it thickens slightly.
The mustard adds a sharp tang that cuts through the richness of the pork, creating a sauce that’s both bold and balanced. Drizzle over the ribs and serve with roasted Brussels sprouts for a sophisticated yet easy weeknight meal. 🥬
Nutrition facts
Frequently asked questions
Can I use frozen boneless pork ribs in this recipe?
Thaw the ribs completely in the refrigerator overnight before prepping. Never thaw at room temperature—this creates a dangerous bacteria growth zone. For a quick thaw, use the defrost setting on your microwave (follow manufacturer instructions), but pat them thoroughly dry before seasoning to ensure proper browning.
What's the difference between boneless pork ribs and regular pork ribs?
Boneless pork ribs come from the same primal cut but have the bone and cartilage removed, making them more tender and quicker to cook. Regular pork ribs (like baby back or spare ribs) have bones that require longer cooking times. The pressure cooker method works perfectly for both, but boneless ribs cook 30-40% faster and yield more usable meat per pound.
My pressure cooker ribs turned out dry—what went wrong?
This usually happens when ribs are overcooked or not rested properly. Stick to the 25-minute high-pressure time and always let them rest 10 minutes after cooking. For extra moisture, add ¼ cup apple juice or beef broth to the pressure cooker. The ribs should be fork-tender but still slightly juicy—if they're falling apart completely, you likely overcooked them.
Can I make this recipe in a stovetop pressure cooker?
Yes, the method is identical! Just follow the same 25-minute high-pressure time and natural release. Stovetop pressure cookers often require slightly longer cooking times than electric models, so check for doneness at 22 minutes if concerned. Always use a meat thermometer—ribs are done at 203°F internal temperature. Safety tip: Never exceed your pressure cooker's maximum fill line.
How do I store leftovers?
Store cooked ribs in an airtight container in the fridge for up to 4 days. For best texture, reheat in the pressure cooker with 2 tbsp broth on high pressure for 3 minutes, then quick-release. They also freeze beautifully—portion into freezer bags with sauce and freeze for up to 3 months. Thaw overnight in the fridge before reheating.