
Main Courses
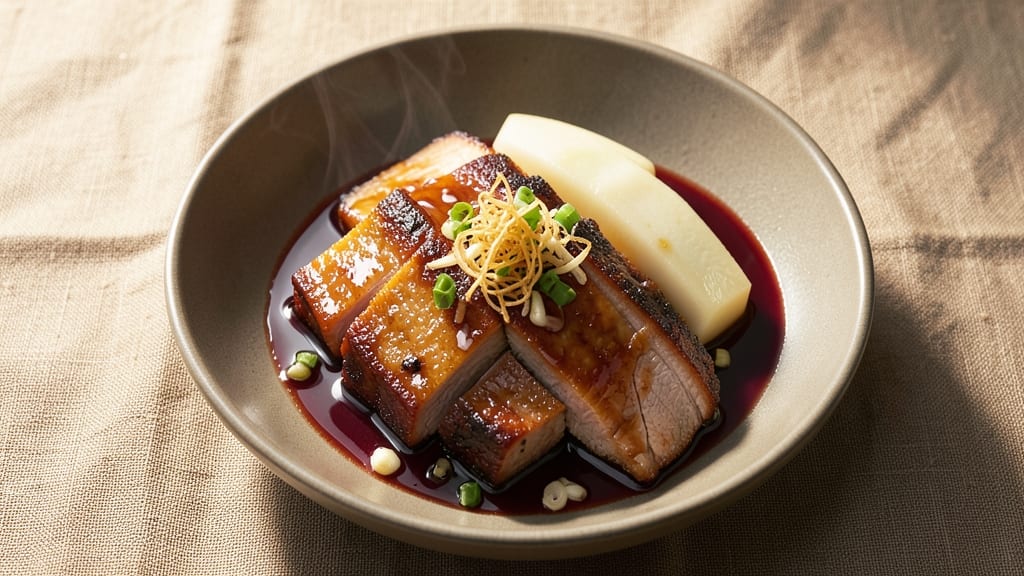
This braised pork belly with taro recipe transforms humble ingredients into a dish that marries crispy, five-spice-glazed pork with silky, earthy taro roots—restaurant-quality depth achieved through low-and-slow braising. The secret lies in balancing sweet, savory, and aromatic spices while preserving the pork's melt-in-your-mouth tenderness.
I developed this after years of perfecting braising techniques, ensuring every bite delivers a harmonious contrast of textures and flavors.
The process begins with a 30-minute marinade of pork belly in a five-spice blend, garlic, and soy, followed by a 3-hour braise at 300°F until the meat is fork-tender. Meanwhile, taro roots are parboiled and glazed with a touch of honey and sesame oil, creating a velvety, caramelized finish.
This method ensures the pork stays juicy while developing rich, complex flavors—no dry or tough results here.
What you'll end up with is a dish that's elegant yet approachable: crispy edges on the pork, silky roots, and a glossy sauce that ties it all together. The five-spice glaze adds warmth and depth, while the taro brings an earthy sweetness that cuts through the richness.
Serve with steamed jasmine rice or quick-pickled vegetables for a complete meal that feels both comforting and sophisticated.
This recipe is perfect for special occasions or when you want to impress without fuss. The braising process is hands-off, allowing flavors to develop naturally, while the taro adds a unique twist that elevates the dish beyond traditional pork belly preparations. Let's get started—your taste buds will thank you.
Ingredients for braised pork belly with taro
Restaurant-quality depth from humble ingredients—crispy pork meets silky taro with five-spice magic.
| Ingredient | Amount | Notes |
|---|---|---|
| Pork Belly 🥓 | 2 lb | Skin-on, cut into 1-inch thick slices |
| Taro Roots 🥔 | 2 lb | Peeled, cut into 1-inch chunks |
| Five-Spice Powder 🌶️ | 2 tbsp | Store-bought or homemade blend |
| Garlic Cloves 🧄 | 6 cloves | Minced for marinade and braise |
| Fresh Ginger 🌿 | 2 tbsp | Grated, for marinade and sauce |
| Dark Soy Sauce 🍶 | ½ cup | For marinade and braising liquid |
| Honey 🍯 | 2 tbsp | For taro glaze and pork finish |
| Sesame Oil 🫒 | 1 tbsp | Toasted, for finishing |
| White Wine 🍷 | ½ cup | Dry, for deglazing |
| Vegetable Oil 🫒 | 2 tbsp | For searing pork belly |
| Salt 🧂 | 1 ½ tsp | Kosher salt for seasoning |
| Black Pepper 🌶️ | ½ tsp | Freshly cracked |
| Jasmine Rice 🍚 | 2 cups | Uncooked, for serving |
The pork belly is non-negotiable here. Look for thick-cut pieces with good marbling—ask your butcher for skin-on if possible, as it crisps beautifully during braising. Costco and specialty Asian markets often carry pre-sliced pork belly, but a whole piece lets you control the thickness. Taro roots should be firm and free of soft spots; Asian grocery stores usually carry them pre-peeled, but you can peel them yourself with a sharp knife. The five-spice powder is the soul of this dish—Penzeys or Spicewalla blends are ideal, but any good-quality five-spice will work. Toast it lightly in a dry pan before using to deepen the flavors.
No five-spice powder? Mix 1 tsp each of star anise, cinnamon, fennel, clove, and Sichuan peppercorn for a DIY version. Substituting pork belly? Pork shoulder works too, but it won’t have the same crispy edges. For the taro glaze, honey can be swapped for maple syrup or agave, though honey’s floral notes complement the dish beautifully. Short on sesame oil? Toasted peanut oil adds a similar richness. The white wine is key for deglazing—use something dry like Sauvignon Blanc or Pinot Grigio that you’d actually drink. If you’re avoiding alcohol, substitute with extra vegetable broth.
Pork belly marinades best overnight, but 30 minutes is fine for this recipe—just let it sit at room temperature while you prep the taro. The taro chunks should be parboiled until just tender, then glazed while the pork braises. Store any leftovers in an airtight container for up to 5 days in the fridge; the flavors only deepen over time. For a quick meal, reheat portions in the oven at 300°F until warmed through. The rice? Cook it ahead—jasmine rice takes 15 minutes, so it’s ready when the pork is finished.
Why You'll Love This Recipe
- One-Pot Magic: Honestly, I swear by this recipe because it’s one pot—no chopping boards covered in pork fat, no extra pans to scrub. The taro just sits there, soaking up all that five-spice and garlic perfume while the pork belly renders into crispy, caramelized bliss. (Yes, even on a Tuesday night.)
- Deep Umami Hug: Between us, the combo of braised pork belly and taro is ridiculously good—like a warm, earthy hug for your taste buds. The five-spice powder gives it this cozy, slightly sweet depth, while the ginger and garlic cut through the richness. That crispy edge on the pork? Chef’s kiss.
- Leftovers That Don’t Suck: I make this intentionally for leftovers because it actually gets better the next day. The pork stays tender, the taro soaks up even more flavor, and reheating it is just about dumping it back in the pan with a splash of water. (My lunch for three days, no lie.)
- Budget-Friendly Feast: Pork belly sounds fancy, but this recipe stretches it so far—you’re feeding a crowd for the price of one restaurant meal. The taro adds bulk without cost, and the spices? A tiny jar lasts for months. It’s my go-to for potlucks or when friends drop by unannounced.
Step-by-step instructions for braised pork belly with taro
Here's how to transform crispy pork belly and tender taro into a rich, aromatic dish that balances texture and flavor perfectly.
Marinate and Sear the Pork Belly
In a bowl, combine the 2 tbsp Five-Spice Powder, minced 6 cloves Garlic Cloves, 2 tbsp Fresh Ginger, 0.5 cup Dark Soy Sauce, 2 tbsp Honey, 1.5 tsp Salt, and 0.5 tsp Black Pepper. Rub this mixture all over the 2 lb Pork Belly slices, coating them evenly. Let the pork marinate for at least 30 minutes—this ensures deep flavor penetration and a fragrant crust.
Heat 2 tbsp Vegetable Oil in a heavy Dutch oven over medium-high heat. Once shimmering, add the pork belly slices and sear for 4-5 minutes per side until the skin is deep golden brown and crispy. The fat should render beautifully, creating a rich foundation for the braise. Remove the pork and set it aside on a plate.
Sauté Aromatics and Deglaze
In the same Dutch oven, reduce the heat to medium and add the remaining 2 tbsp Fresh Ginger and 6 cloves Garlic Cloves (if any were reserved). Sauté for 1 minute until fragrant—this step builds the aromatic base of your dish. Pour in the 0.5 cup White Wine, scraping up any browned bits from the bottom of the pot with a wooden spoon. Let the wine simmer for 2-3 minutes until reduced by half.
Here's where it gets good: the wine's acidity cuts through the richness of the pork, creating balance. If the liquid reduces too quickly, don't rush—let it work its magic. You'll know it's ready when the volume is noticeably reduced and the aroma is intense.
Braise the Pork Belly
Return the seared pork belly to the Dutch oven. Add 1 cup water (enough to come about halfway up the sides of the pork) and bring to a gentle simmer. Cover tightly with a lid and transfer to a 325°F oven. Braise for 2-2.5 hours, or until the pork is fork-tender and the internal temperature reaches 195°F. The skin should remain crispy, while the meat inside melts like butter.
Don't peek during this time—every time you lift the lid, you release steam and extend the cooking process. The pork will develop a beautiful glossy sheen from the braising liquid, and the five-spice will infuse deeply into the meat.
Glaze and Braise the Taro Roots
While the pork braises, prepare the 2 lb Taro Roots by tossing them in a bowl with 1 tbsp Sesame Oil, 1 tbsp Honey, and 1 tsp Salt. Arrange the taro chunks in a single layer on a parchment-lined baking sheet. Roast at 400°F for 25-30 minutes, stirring once halfway through, until they're tender and caramelized with a glossy finish.
For the pork, remove it from the oven and carefully transfer it to a cutting board. Skim any excess fat from the braising liquid, then return the pork to the pot. Increase the oven temperature to 375°F and braise for another 15 minutes to glaze the pork with the reduced sauce. This final step ensures a sticky, flavorful exterior that ties everything together.
Assemble and Serve
Slice the pork belly into ¼-inch thick slices, arranging them over the 2 cups Jasmine Rice you've cooked separately. Spoon the braising liquid and roasted taro roots around the pork. Drizzle with an additional 1 tsp Sesame Oil and garnish with extra Five-Spice Powder for a pop of color and aroma.
Serve immediately while the pork is still warm and the taro roots are tender. The contrast of crispy pork skin, silky taro, and fragrant rice creates a harmonious bite that's both comforting and sophisticated. The five-spice glaze adds a subtle warmth that lingers on the palate, making this dish unforgettable.
Pro Tips For Making Braised Pork Belly With Taro
- CRISP THE BELLY FIRST: Don’t skip the high-heat sear—let that pork belly hit 350°F (175°C) until the fat renders and the skin turns golden. I used to rush this, and my braise always tasted flat. Two minutes per side, no excuses.
- PEEL TARO LAST MINUTE: Keep those taro roots whole and unpeeled until you’re ready to add them to the pot. The skin adds texture, and peeling too early makes them watery. Just scrub them clean and drop them in raw—works every time.
- DON’T OVERCROWD THE PAN: If your pork belly slices are too thick, cut them thinner or braise in batches. I learned this after my first attempt turned into a sad, greasy mess. Fat needs room to render, not a steamy sauna.
- GINGER-GARLIC PASTE SAVES TIME: Mince the garlic and ginger into a paste with a splash of water—no knife work, no burning. Slap it straight into the pot with the five-spice and soy sauce. Takes 2 minutes and guarantees even flavor. (Yes, even if you’re impatient like me.)
Storing and reheating this dish
Fridge Storage Tips
Store your braised pork belly with taro in an airtight container for up to 5 days in the refrigerator. I always let it cool completely before transferring—this prevents condensation that can make the pork soggy.
Place a paper towel over the top to absorb any excess moisture. The flavors actually deepen overnight, so leftovers taste even better reheated. 💪
Freezer-Friendly Method
For long-term storage, freeze portions in single-serving glass containers—they reheat more evenly than plastic. Label with the date and freeze for up to 3 months. When ready to eat, thaw overnight in the fridge, then reheat gently.
The taro holds up beautifully in the freezer, though it may soften slightly after thawing. 🥶
Oven Reheating Perfection
My preferred method is reheating in a 350°F oven on a wire rack over a baking sheet. This ensures crispy edges on the pork while warming through evenly—about 20-25 minutes covered with foil.
Add a splash of water or broth to the container to prevent drying. The taro can go straight from freezer to oven if you're short on time. ✨
Stovetop Quick Fix
For a faster option, use a heavy-bottomed pot on medium-low heat with 2 tbsp water to prevent sticking. Cover and reheat for 10-12 minutes, stirring occasionally. The pork belly's fat will render again, creating a luscious sauce.
I like to finish with a drizzle of sesame oil and extra five-spice powder for freshness. 🔥
Microwave Safety
If you're in a rush, microwave in 1-minute intervals on 50% power, stirring between each interval. Add 1 tbsp water to keep things moist. The taro will soften more than the pork, so I recommend reheating just the pork separately if texture matters.
This method works best for quick lunches when you're short on time. ⏰
Serving Leftovers Creatively
Transform leftovers into pork belly tacos with corn tortillas and pickled veggies, or pork fried rice with day-old jasmine rice. The braised taro adds a unique texture to stir-fries—toss it with garlic and chili oil for a quick side. Leftovers never feel like leftovers when you get creative! 🌟
Nutrition facts
Frequently asked questions
Why does the pork belly need to marinate before braising?
The 30-minute marinade is key for two reasons: it infuses the meat with five-spice and aromatic flavors, and it creates a fragrant crust that crisps beautifully during searing. The soy sauce and honey in the marinade also help tenderize the collagen-rich pork belly, ensuring it becomes fork-tender during braising. Don't skip this step—it's what transforms good pork into restaurant-quality pork!
Can I substitute taro with another root vegetable?
You can try sweet potatoes or yams, but they won't have the same earthy sweetness or texture. Taro's unique starchy quality holds up beautifully during braising and develops a lovely caramelized crust. If you must substitute, use purple yams (they're closest in flavor) and reduce the honey in the glaze to 1 tbsp to prevent over-sweetness. The dish will still be delicious, just with a different profile.
How do I know when the pork belly is fully braised?
Your pork is done when it reaches an internal temperature of 195°F and the meat pulls away from the bone with just slight resistance. The skin should remain crispy while the flesh becomes so tender it nearly falls apart. Test with a fork—if it slides in easily and the meat is opaque throughout, it's perfect. Overcooking can dry out the meat, so keep an eye on the temperature after 2 hours of braising.
What's the best way to reheat this dish without drying it out?
For best results, reheat in a 350°F oven on a wire rack over a baking sheet for 20-25 minutes covered with foil. This method preserves the crispy skin while warming the meat gently. If using the stovetop, add 2 tbsp water or broth to the pot and cover for 10 minutes on low heat. Microwaving works in a pinch, but use 50% power in 1-minute intervals with a damp paper towel over the dish.
Can I make this dish ahead of time for a dinner party?
This recipe actually tastes better the next day as flavors meld. Braise the pork and roast the taro 1 day ahead, then store components separately in airtight containers. Reheat the pork in the oven (as above) and warm the taro in a 400°F oven for 10 minutes to revive its texture. Assemble just before serving to maintain crispy edges. The five-spice flavors develop beautifully overnight, making this a perfect make-ahead dish.