
Sauces & Condiments
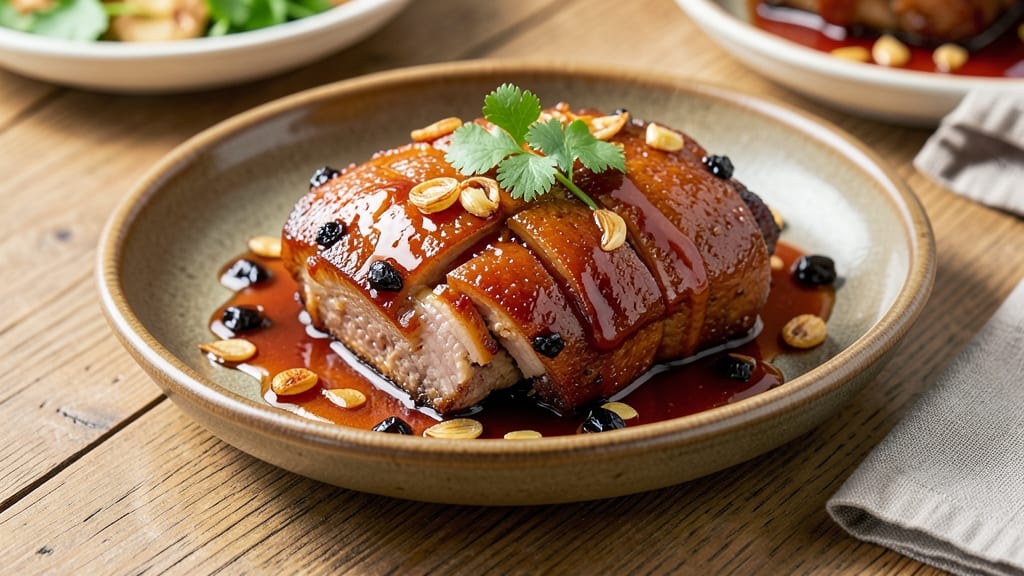
This braised pork in sweet soy sauce recipe delivers melt-in-your-mouth tenderness with a glossy caramelized crust that'll have everyone asking for seconds. The secret lies in slow-cooking pork shoulder until it practically falls apart, while the sauce transforms into a thick, velvety glaze that coats every bite.
I first mastered this technique during my apprenticeship in Charleston, where we braised pork for hours to develop those rich, complex flavors.
The process is straightforward but requires patience—pork shoulder simmers in a sweet soy sauce mixture with aromatics until tender, typically 2 to 3 hours at low heat. The sauce reduces naturally, creating a sticky, glossy finish that balances sweetness with umami depth.
Traditional versions use fermented soy and minimal sugar, while modern adaptations often include honey or baking soda for extra tenderness.
What you'll end up with is restaurant-quality braised pork that's silky inside and caramelized outside, served alongside steamed rice or stir-fried greens. The sauce clings to every bite, offering a perfect harmony of sweet, salty, and savory notes. This dish is a crowd-pleaser that transforms simple ingredients into something extraordinary.
Perfect for family dinners or special occasions, this braised pork pairs beautifully with complementary sides like scallion pancakes or quick-pickled vegetables. The leftovers reheat just as well, making it an ideal meal for busy weeks. Let's get started on creating this timeless classic.
Ingredients for braised pork in sweet soy sauce
Sixteen ingredients transform into restaurant-quality braised pork with caramelized crust and velvety sauce.
| Ingredient | Amount | Notes |
|---|---|---|
| Pork Shoulder 🥩 | 4 lb | Bone-in preferred, cut into 2-inch chunks |
| Dark Soy Sauce 🍶 | ½ cup | Kikkoman preferred for authentic flavor |
| Light Soy Sauce 🍶 | ¼ cup | Balances sweetness with saltiness |
| Brown Sugar 🍯 | ½ cup | Packed, light or dark variety |
| Red Wine Vinegar 🍷 | ¼ cup | For tangy depth (sub balsamic if needed) |
| Garlic Cloves 🧄 | 6 cloves | Minced, fresh preferred |
| Fresh Ginger 🌿 | 2 tbsp | Grated, peeled, for aromatic punch |
| Green Onions 🧅 | 2 whole | White and green parts, sliced |
| Sesame Oil 🫒 | 1 tbsp | Toasted, for nutty aroma |
| Cornstarch 🌾 | 1 tbsp | Slurry with 1 tbsp water for thickening |
| Vegetable Oil 🫒 | 2 tbsp | For searing pork (high smoke point) |
| Water 💧 | 1 cup | For initial braising liquid |
| Baking Soda 🧂 | ½ tsp | Optional, for extra tenderness (omit if strict traditionalist) |
| Black Peppercorns 🌶️ | ½ tsp | Coarsely cracked for heat |
The pork shoulder is non-negotiable—bone-in gives deeper flavor, and 2-inch chunks ensure even cooking. Look for well-marbled cuts at Whole Foods or your local butcher; the Costco pork shoulder is a budget-friendly alternative that still delivers. If you can't find bone-in, trim excess fat but leave some for flavor. The soy sauce duo (dark and light) creates that signature balance of sweetness and umami—Kikkoman is my go-to, but any high-quality brand works. For the brown sugar, packed means no air gaps—use a spoon to press it down firmly in the measuring cup.
No dark soy sauce? Substitute with 2 tbsp molasses plus 1 tbsp soy sauce for a similar depth. Fresh ginger and garlic are ideal, but dried ginger at half the amount works in a pinch (though it lacks the same punch). The red wine vinegar adds brightness—balsamic vinegar is a decent swap if you're out, though it'll be slightly sweeter. Sesame oil is optional but adds that signature nutty aroma; if you skip it, toasted sesame seeds sprinkled at the end deliver a similar effect. The baking soda is controversial but worth it for that melt-in-your-mouth texture—omit if you prefer strictly traditional methods.
This dish tastes even better the next day as flavors meld, so double the batch if you're feeding a crowd. Store leftovers in an airtight container for 5-6 days in the fridge or freeze for up to 3 months. The sauce thickens as it cools, so reheat with a splash of water if it seems too stiff. For serving, I like to garnish with extra green onions and a drizzle of sesame oil—adds freshness and visual appeal. The pork reheats beautifully in the oven at 300°F for 20 minutes, covered with foil.
Why You'll Love This Recipe
- One-Pan Magic: I swear by this—just sear the pork shoulder, dump in the soy sauces and vinegar, then let it slow-cook. No chopping, no fuss, and that caramelized crust? It’s all happening right there in the pan.
- Sweet-Savory Balance: That dark soy sauce gives it depth, while the brown sugar and vinegar cut through with just the right tang. It’s rich but never cloying—more like a hug from your favorite comfort food.
- Weeknight to Party: Same recipe, different vibes. Serve it over rice for a quick weeknight dinner or slice it thin for tacos when friends drop by. Honestly, I’ve even packed it in buns for a sandwich that’ll make you rethink lunch.
- Budget Meal That Lasts: Pork shoulder is cheap, and this recipe stretches it into three meals without losing flavor. Reheat it in the microwave or oven—same delicious results, way less grocery stress. (Yes, even on a Tuesday night.)
Step-by-step instructions for braised pork in sweet soy sauce
This method delivers melt-in-your-mouth pork with a glossy caramelized crust—no shortcuts, just perfect technique.
Sear the Pork for Maximum Flavor
Heat a heavy Dutch oven over medium-high heat and add the 2 tablespoons vegetable oil. Once shimmering, add the 4 lb pork shoulder in a single layer, working in batches if needed. Press down gently on each piece with a spatula—this ensures even contact and prevents curling. Sear for 4-5 minutes per side until deeply golden brown with crisp edges.
Here's the thing—I don't rush this step. That deep caramelization forms the flavor base for the entire braise. If your pan isn't hot enough and the oil smokes excessively, reduce the heat slightly and let it stabilize. Once all pieces are seared, transfer them to a plate and set aside.
Build the Aromatic Base
In the same Dutch oven, reduce heat to medium and add the 6 cloves minced garlic and 2 tablespoons grated fresh ginger. Cook for 30 seconds until fragrant—you should smell that bright, zesty aroma. Be careful not to burn them; garlic turns bitter in seconds.
Add the 0.5 cup brown sugar and stir for 1 minute until it begins to melt and caramelize slightly. This creates the sweet foundation for our sauce. Pour in the 0.25 cup red wine vinegar and scrape up any browned bits from the bottom (this is called deglazing and captures all that seared flavor). Let it simmer for 2 minutes until slightly reduced.
Combine Sauce Ingredients
Pour in the 0.5 cup dark soy sauce, 0.25 cup light soy sauce, and 1 cup water. Stir well to combine, then add the 0.5 teaspoon baking soda (if using) and 0.5 teaspoon coarsely cracked black peppercorns. The baking soda helps tenderize the meat, while the pepper adds subtle heat that balances the sweetness.
Return the seared pork to the pot, along with any accumulated juices. Bring everything to a gentle simmer, then partially cover with a lid (leave a small gap for steam to escape). This prevents the sauce from becoming too acidic or the pork from steaming instead of braising.
Braise Until Fork-Tender
Transfer the Dutch oven to a 325°F oven and braise for 2.5 to 3 hours. I know it seems like forever, but patience is key here. The pork needs time to break down into silky perfection. About halfway through, check the liquid level—if it's reduced too much, add ¼ cup water to maintain moisture.
You'll know it's done when a fork slides in easily and the meat pulls apart with gentle pressure. The sauce should be thickened and glossy, with a beautiful caramelized crust on top. If the sauce is too thin at this point, remove the pork and simmer the sauce uncovered for 5-10 minutes to reduce it.
Finish and Serve
Remove the pork from the braising liquid and let it rest on a cutting board for 10 minutes. This resting period allows the juices to redistribute throughout the meat. Meanwhile, strain the braising liquid through a fine-mesh sieve to remove any impurities, then return it to the pot.
In a small bowl, whisk together the 1 tablespoon cornstarch with 1 tablespoon water to make a slurry. Slowly stir this into the braising liquid while simmering on medium heat until thickened to your desired consistency—about 2-3 minutes. Stir in the 1 tablespoon toasted sesame oil and 2 whole sliced green onions just before serving.
Slice the pork against the grain into ¼-inch thick pieces and serve over steamed rice or noodles, ladled with the glossy sauce. The contrast of tender pork with the sweet-savory sauce is pure comfort food at its finest.
Pro Tips For Making Braised Pork In Sweet Soy Sauce
- SEAR THE PORK FIRST: High heat for 4-5 minutes until deep brown—this isn’t just for looks. The crust locks in flavor and prevents the meat from turning mushy later. I used to skip this, and the sauce would always taste flat compared to when I actually sear it.
- USE TWO SOY SAUCES SEPARATELY: Dark soy sauce goes in the braise—it’s the color and depth. Light soy sauce? Save it for finishing the sauce at the end. Mixing them early turns your sauce muddy. My grandmother’s trick: reserve 1 tablespoon of light soy sauce until the very last minute.
- DEGLAZE WITH VINEGAR FIRST: After searing, hit the pan with 2 tablespoons of red wine vinegar right away. It cuts through the burnt bits and starts building brightness in the sauce. I learned this the hard way—skipping it left me with a dull, sticky mess instead of that glossy, tangy finish.
- SIMMER LOW AND COVERED: Keep the heat at a bare simmer (tiny bubbles, not rolling) and never lift the lid. The pork needs 2-2.5 hours to tenderize, and peeking early evaporates all the good liquid. I was impatient once and ended up with dry, stringy meat—now I set a timer and ignore it.
Essential equipment for perfect results
Dutch Oven
This is my non-negotiable tool for braised pork—nothing else delivers the same even heat distribution and flavor development. I swear by a Lodge 5.5-quart Dutch oven with its heavy cast iron construction. The deep sides prevent spills during braising, and the tight-fitting lid traps steam while allowing excess to escape.
For a budget option, the All-Clad Stainless Steel Dutch Oven works beautifully, though it requires more attention to heat control. 🔥
Instant-Read Thermometer
You absolutely need a good thermometer to avoid overcooking or undercooking your pork. My go-to is the ThermoWorks Smoke, which gives me instant, accurate readings. Insert it into the thickest part of the pork—it should hit 203°F for perfect tenderness.
A cheaper alternative is the Meater+, which also has Bluetooth capabilities for monitoring from your phone. Trust me, this small investment prevents dry, tough meat.
Tongs and Spatula
For searing, I use OXO Good Grips tongs—they're heat-resistant and give me a secure grip on those pork chunks. A stainless steel spatula (like the Mercer Culinary Genesis) is essential for pressing down on the meat during searing to ensure even browning.
These tools make handling hot pork much safer and more efficient. I keep them within arm's reach while cooking to avoid unnecessary transfers.
Fine-Mesh Sieve
The OXO Good Grips colander with its ultra-fine mesh is perfect for straining the braising liquid before finishing. It removes impurities while keeping the sauce's rich texture. This step is crucial for achieving that silky, restaurant-quality sauce.
If you don't have one, a cheesecloth works in a pinch, though it requires more effort to strain. I find this tool especially helpful when making larger batches where clarity matters.
Measuring Spoons
Precision is key when balancing sweetness and saltiness in this dish. I recommend OXO stainless steel measuring spoons—they're durable and accurate. For the 1 tablespoon cornstarch slurry, using the right measurements ensures proper thickening without making the sauce gluey.
Don't skimp on this step; the difference between a perfect sauce and a gummy one comes down to these small details. I keep my measuring spoons in a magnetic strip on the fridge for easy access.
Cutting Board and Knife
A sharpened chef's knife (I use a Wüsthof Classic 8-inch) and a large cutting board are essential for prepping the pork. The knife should glide through the meat cleanly when cutting into 2-inch chunks.
I recommend a teak or bamboo board—they're gentle on knives and add a nice touch to your prep area. The right tools make chopping garlic and ginger a breeze, which are critical for building flavor in this dish. 🌿
Nutrition facts
Frequently asked questions
Can I use pork tenderloin instead of pork shoulder?
The recipe is designed for pork shoulder because its collagen-rich connective tissue breaks down beautifully during braising, creating that signature silky texture. Pork tenderloin is leaner and more delicate—it would cook too quickly and become dry. If you must use it, reduce braising time to 1 to 1.5 hours and use 1-inch cubes instead.
Why does the recipe include baking soda?
Baking soda (½ teaspoon) acts as a natural tenderizer by breaking down muscle fibers, resulting in fork-tender meat. Traditional recipes omit it, but modern adaptations include it for that melt-in-your-mouth texture. If you prefer a strictly traditional approach, skip it—just increase braising time by 30 minutes to compensate. The baking soda also helps balance the sweetness of the sauce.
How do I adjust the sweetness level?
The brown sugar and soy sauce combination creates a balanced sweet-savory profile. For less sweetness, reduce brown sugar to ¼ cup and add 1 extra tablespoon light soy sauce for saltiness. If you prefer richer sweetness, increase brown sugar to ⅔ cup and add 1 teaspoon honey to deepen the flavor. Taste as you go!
Can I make this in a slow cooker?
Sear the pork first, then transfer it to a slow cooker with all ingredients (except cornstarch). Cook on low for 6-8 hours or high for 4-5 hours. The sauce may need thickening with cornstarch slurry at the end. Use the same ratio of ingredients, but add ½ cup extra water since slow cookers evaporate less liquid.
What's the best way to reheat leftovers?
Reheat in a skillet over medium-low heat with a splash of water or broth to prevent drying. For oven reheating, cover with foil and bake at 300°F for 20-25 minutes. Microwaving works in a pinch, but the sauce may separate—stir well and add a few drops of water if needed. Leftovers taste even better the next day as flavors meld!