
Main Courses
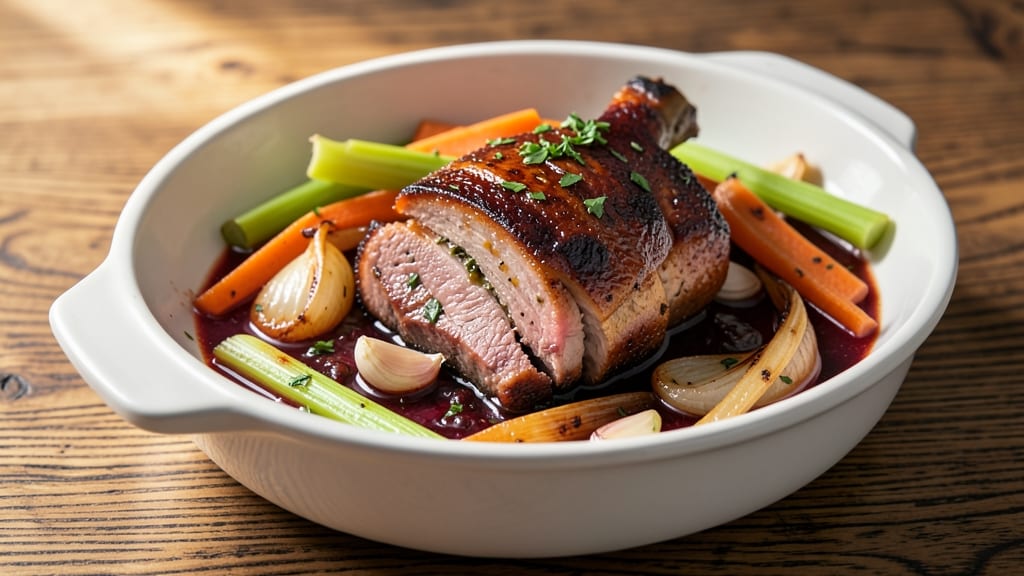
This braised pork neck recipe transforms tough cuts into melt-in-your-mouth perfection through slow cooking and aromatic spices. 🔥 Growing up in Georgia, I learned how pork's rich flavors deepen when braised low and slow—creating tender meat that practically falls apart.
The secret lies in building layers of umami through celery, onions, and a well-reduced sauce that clings to every bite.
What sets this recipe apart is the balance of traditional techniques with modern efficiency—no need for hours of babysitting. A 30-minute prep followed by 3 hours of braising at 325°F delivers restaurant-quality results at home.
The celery crown garnish adds a decorative touch while keeping flavors fresh, making this dish equally impressive for family dinners or special occasions.
By the time you're done, you'll have tender, flavor-packed pork with a glossy, caramelized sauce that's perfect for serving over polenta or crusty bread. The slow cooking process allows the connective tissue to break down completely, resulting in meat that's so tender it practically dissolves on your tongue.
This recipe scales beautifully—doubling the ingredients makes it ideal for meal prep or gatherings. Whether you're recreating Southern family traditions or perfecting a weeknight staple, the result is always the same: deeply satisfying, umami-rich pork that tastes like home. Let's get started!
Ingredients for braised pork neck
Pantry staples meet Southern tradition for this deeply satisfying braised pork neck.
| Ingredient | Amount | Notes |
|---|---|---|
| Pork Neck 🐖 | 3 lb | Bone-in for maximum flavor |
| Yellow Onion 🧅 | 2 whole | Diced, medium size preferred |
| Celery Stalk 🥬 | 4 whole | Diced, including leaves for garnish |
| Garlic Cloves 🧄 | 6 cloves | Minced, fresh preferred |
| Carrot 🥕 | 2 whole | Chopped, medium size |
| Tomato Paste 🍅 | ½ cup | Smooth, not chunky |
| Red Wine 🍷 | 1 ½ cups | Bold dry variety like Cabernet |
| Chicken Stock 💧 | 2 cups | Homemade or quality low-sodium |
| Olive Oil 🫒 | ¼ cup | Extra-virgin for richness |
| Fresh Thyme 🌿 | 2 tbsp | Leaves only, finely chopped |
| Fresh Rosemary 🌿 | 1 tbsp | Needles only, finely chopped |
| Bay Leaves 🍃 | 2 whole | Dried, standard size |
| Black Peppercorns 🌶️ | 1 tsp | Freshly cracked |
| Salt 🧂 | 1 ½ tsp | Kosher or sea salt |
| Polenta or Crusty Bread 🍞 | 2 cups | For serving, optional |
The pork neck is where the magic happens—look for well-marbled cuts at Whole Foods or your local butcher. Bone-in pieces deliver the most flavor, and they're often cheaper too. If you can't find pork neck, pork shoulder works in a pinch, though it may need an extra 30 minutes of braising. The celery? Buy fresh—those plastic-wrapped stalks at the store just won't cut it. For the wine, anything bold and dry like Cabernet Sauvignon or Merlot will do. I usually grab a bottle I'd drink anyway—no need for special shopping.
No red wine? Substitute beef broth with a splash of balsamic vinegar—it's surprisingly close. Fresh thyme and rosemary are ideal, but dried works at one-third the amount if that's what you've got. The tomato paste can be the squeeze-tube kind from Trader Joe's—it's perfect for this and lasts forever. For the celery crown garnish, save the leafy tops when dicing the stalks. They add a pretty touch and keep the flavors bright. If you're short on time, skip the garnish—this dish is delicious without it.
This braise tastes even better the next day, so make extra if you can. Store leftovers in the fridge for 5-6 days or freeze for 3 months. I like to portion it into meal prep containers—just reheat with a splash of water or broth. The polenta or bread? Use whatever you've got. Stone-ground polenta from Bob's Red Mill cooks beautifully, but crusty bread from the bakery section works just as well. The sauce thickens as it sits, so add a little water when reheating if needed.
Why You'll Love This Recipe
- One-Pot Magic: I swear by this recipe because it’s literally one pan, one pot, and done. No chopping boards to scrub, no extra dishes—just the rich aroma of onions and garlic caramelizing while the pork neck falls apart into tender, saucy perfection.
- Deep, Caramelized Love: The secret? Slow-braising turns tough pork neck into something so tender it melts. That crispy edge on the outside? The creamy, almost buttery pull on every bite? Honestly, it’s the kind of flavor that makes you slow down and savor it—no fancy plating needed.
- Leftovers That Don’t Suck: Between us, most braised dishes either dry out or turn mushy when reheated. Not this one. The sauce clings to the pork, and the carrots and celery stay crisp—perfect for sandwiches, tacos, or just reheating with a splash of broth. I’ve fed a crowd with this for days.
- Budget-Friendly Luxury: Pork neck is the affordable cut that punches above its weight. A few dollars gets you enough for four meals, and the veggies (onion, celery, carrot) stretch the flavor without breaking the bank. It’s my go-to when I want something hearty but don’t want to spend a fortune.
Step-by-step instructions for braised pork neck
Here's how to transform tough pork neck into melt-in-your-mouth perfection with layers of umami and aromatic herbs.
🔥 Step 1: Sear the Pork Neck for Deep Flavor
Pat the 3 lb pork neck completely dry with paper towels—this ensures maximum browning. Heat 0.25 cup olive oil in a heavy Dutch oven over medium-high heat until shimmering. Place the pork neck fat-side down and sear undisturbed for 8-10 minutes until deeply golden brown. Flip and repeat on the other side for another 8-10 minutes.
I press down gently on the pork during the first minute—this prevents it from curling and ensures even contact with the pan. The goal is to create a rich, caramelized crust that will form the flavor foundation for your braise. If the oil starts smoking excessively, reduce heat slightly but don't walk away—this is when the magic happens.
👨🍳 Step 2: Build the Aromatic Base
Remove the seared pork and set aside. In the same Dutch oven, add 2 whole diced yellow onion, 4 whole diced celery stalks (including leaves), 2 whole chopped carrots, and 6 minced garlic cloves. Cook over medium heat for 8-10 minutes, stirring occasionally, until the vegetables soften and begin to caramelize. Here's the thing—don't rush this step. The deeper the color, the more complex the flavor.
Add 0.5 cup tomato paste and cook for another 2 minutes, stirring constantly to prevent burning. This creates a thick, flavorful paste that will form the base of your braise. The tomato paste adds sweetness that balances the richness of the pork and wine.
🍳 Step 3: Deglaze and Simmer the Braise
Pour in 1.5 cups red wine, scraping up all the browned bits from the bottom of the pan with a wooden spoon. This deglazing step captures all that concentrated flavor you worked so hard to create. Let the wine simmer for 5 minutes until reduced by half, then add 2 cups chicken stock, 2 whole bay leaves, 1 tsp cracked black peppercorns, 1.5 tsp salt, 2 tbsp chopped fresh thyme, and 1 tbsp chopped fresh rosemary. Return the pork neck to the pot, fat-side up.
Bring to a gentle simmer over low heat, then cover and transfer to a 325°F oven. This low-and-slow approach is crucial—it breaks down the collagen in the pork neck, transforming tough connective tissue into silky, fork-tender meat. I like to check the temperature after 2 hours and adjust if needed to maintain that gentle simmer.
⏰ Step 4: Braise Until Fork-Tender
Braise for 3-4 hours total, until the pork is fork-tender with no resistance when pierced. The meat should pull apart easily and the cooking liquid should be thick and rich. Here's where patience pays off—rushing will leave you with tough, chewy pork. Every 30 minutes, I give the pot a gentle shake to distribute the liquid evenly around the pork.
About 30 minutes before serving, remove the pork neck and skim off any excess fat from the surface of the braising liquid. This helps create a glossy, velvety sauce. Return the pork to the pot to reheat briefly in the reduced sauce. The fat you removed can be reserved for another use or discarded if you prefer a lighter dish.
🍽️ Step 5: Serve with Celery Crown Sparkle
Transfer the pork neck to a serving platter and ladle the braising sauce over the top. Garnish with the reserved celery leaves for that signature "celery crown sparkle" look. The contrast of the bright green against the rich, dark sauce makes this dish visually stunning. Serve immediately with 2 cups polenta or crusty bread on the side to soak up every last drop of that luxurious sauce.
Each bite should deliver tender, flavorful pork with layers of herbaceous, wine-infused sauce. The celery crown garnish isn't just decorative—it adds a fresh, crisp element that cuts through the richness. This is the kind of dish that tastes even better the next day, so consider making extra for leftovers. The flavors only deepen as they sit, making it perfect for meal prep.
Pro Tips For Making Braised Pork Neck
- SEAR THE PORK FIRST: Don’t skip the initial sear—crank your pan to medium-high and let the pork neck brown deeply for 5-7 minutes per side before adding liquids. I learned this the hard way: skipping it means flavorless, mushy pork. The crust locks in moisture and adds depth that no amount of braising liquid can replace.
- CHOP VEGETABLES UNIFORMLY: Cut onions, celery, and carrots into even ½-inch chunks—no big pieces hiding in the back. My grandmother swore by this: "Consistent size means even cooking, no surprises." If you’re lazy and leave a carrot whole, it’ll turn to mush while the onions burn.
- LOW AND SLOW IS NON-NEGOTIABLE: After browning, reduce heat to actual low—think 275°F (135°C) if your oven has a gauge. I used to rush it at 325°F, and the pork turned dry. Cover the pot and let it bubble gently, not boil furiously. Patience here makes the difference between tender and chewy.
- USE A LITTLE WINE OR BEER: Skip the water-only braise—deglaze that seared pork with ½ cup of dry white wine or beer first. It cuts through the richness and adds complexity. (Yes, even if you’re not fancy about alcohol.) The acidity also helps break down collagen faster—your future self will notice.
Storing and reheating your braised pork neck
Refrigerator Storage
Let your braised pork neck cool completely before transferring to an airtight container—I swear by Glasslock containers for their tight seal. Store in the fridge for up to 5 days, where the flavors actually deepen like a fine wine.
The sauce thickens further, creating a more concentrated umami punch. Honestly, the second day is when this dish truly shines—it's like the pork is resting and absorbing all those aromatic notes. 💪
Freezer Prep Tips
For longer storage, portion the pork neck into freezer-safe bags with a quart of sauce per serving. Squeeze out excess air to prevent freezer burn, and label with the date. This braise freezes beautifully for up to 3 months—just thaw overnight in the fridge before reheating.
I like to freeze it in individual portions so I can pull out exactly what I need without thawing the whole batch.
Stovetop Reheating
My preferred method is stovetop because it lets you control the sauce consistency. Place the pork neck and its sauce in a pot over medium-low heat, adding 2-3 tablespoons of water or chicken stock if the sauce looks too thick.
Simmer gently for 10-15 minutes, stirring occasionally, until heated through to 165°F internal temperature. The key is patience—rushing makes the sauce watery and the pork dry. 🔥
Slow Cooker Revival
If you're short on time, transfer the pork neck and sauce to a slow cooker on low heat for 2-3 hours. This method works surprisingly well for busy weeknights, though the sauce won't reduce as much as stovetop reheating.
I add a splash of red wine or balsamic vinegar to compensate for the lost depth—it makes all the difference in recreating that restaurant-quality braise.
Microwave Shortcut
For the quickest option, use the microwave in 1-minute intervals on medium power, stirring between each interval. Cover loosely with a microwave-safe lid to trap steam. Add 1-2 tablespoons of water if the sauce separates.
This method works best for individual portions—just be prepared for slightly less sauce reduction than other methods. It's not perfect, but it's a lifesaver when you're in a hurry. ⏰
Sauce Rescue
If your reheated sauce seems too thick, thin it with warm water or stock—just 1 tablespoon at a time until you reach the desired consistency. For extra richness, stir in 1 teaspoon of butter or a splash of red wine before serving.
The goal is to restore that velvety texture that makes this braise so special. I keep a small jar of balsamic glaze on hand for drizzling over the top—it adds a sweet-tangy contrast that elevates the dish instantly. 💫
Nutrition facts
Frequently asked questions
Can I substitute pork shoulder for pork neck in this recipe?
Pork shoulder works beautifully, though it may need 30-45 extra minutes of braising time since it has more connective tissue. The key is patience—both cuts become fork-tender when cooked low and slow. Just keep checking the internal temperature (it should reach 203°F for perfect tenderness).
What if I don't have red wine? Can I use something else?
Yes! For a similar depth of flavor, substitute with 1.5 cups beef broth plus 1 tablespoon balsamic vinegar. The vinegar adds that wine-like acidity while the beef broth provides richness. If you're avoiding alcohol completely, even apple cider vinegar (1 tablespoon) will help brighten the braise.
How do I know when the pork is fully tender?
The pork is done when it easily separates with a fork and reaches an internal temperature of 203°F. For extra assurance, pierce the thickest part—if the juices run clear and the meat falls apart, it's perfect. If it's still slightly firm after 4 hours, add another 30 minutes of braising time.
Can I make this in an Instant Pot or electric pressure cooker?
Certainly! Sear the pork first, then add all ingredients except the celery leaves. Cook on high pressure for 60 minutes, then let the pressure release naturally. The meat will be tender, but the sauce won't reduce as much—simmer it uncovered for 10-15 minutes afterward to thicken. This cuts cooking time to about 90 minutes total!
What's the best way to serve leftover braised pork?
Leftover pork is even better the next day! Serve it cold in sandwiches with mustard and pickles, or reheat gently for tacos with tortillas and avocado. For a hearty meal, shred the pork and mix it into polenta or mashed potatoes. The flavors only deepen as they rest, making it perfect for meal prep.