
Main Courses
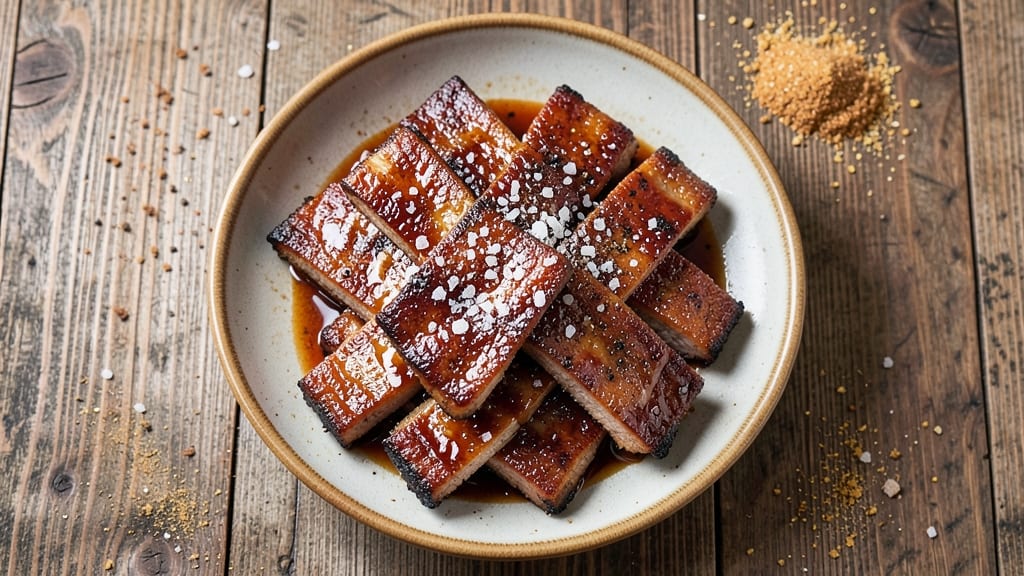
This brown sugar pork ribs recipe delivers that perfect balance of sticky-sweet glaze and caramelized edges that turns weeknight dinners into showstopping meals. After years of perfecting my technique—from the smoky pit to the home grill—I've cracked the code for ribs that are tender enough to pull apart yet hold their shape beautifully. The secret lies in a dry rub that develops deep flavor during the cook, followed by a brown sugar glaze that caramelizes into a glossy, crackling finish.
The process starts with a simple yet effective dry rub—just salt, pepper, paprika, and brown sugar—that creates a flavorful crust while keeping the meat tender. For best results, I recommend cooking these ribs low and slow, either in a smoker or oven, until they reach 203°F internal temperature.
This ensures the collagen breaks down into gelatin, making every bite melt-in-your-mouth perfect. The brown sugar glaze isn't just for sweetness; it adds a rich caramel depth that complements the smoky, savory notes of the pork.
What makes this recipe truly special is the balance of textures—crispy caramelized edges that shatter with each bite and tender meat that falls apart effortlessly. The glaze should be thick enough to stick to the ribs but not so heavy that it overwhelms the natural flavor of the pork.
This method works equally well for baby back ribs or spare ribs, making it versatile enough for any occasion. Once you try these, you'll never settle for store-bought again.
Pair these ribs with classic sides like tangy coleslaw, buttery cornbread, or baked beans to complete the meal. The key to serving is letting the ribs rest for 10 minutes after cooking—this allows the juices to redistribute, ensuring every bite is as tender as the first.
Trust me, once you master this technique, you'll be the BBQ star of every gathering.
Ingredients for brown sugar pork ribs
Sweet, smoky, and sticky—these 13 ingredients transform simple ribs into showstopping centerpieces.
| Ingredient | Amount | Notes |
|---|---|---|
| Pork Ribs (Baby Back or Spare Ribs) 🥓 | 4 lb | Bone-in, meaty cuts preferred |
| Light Brown Sugar 🍯 | ½ cup | Packed, not granulated |
| Kosher Salt 🧂 | 2 tbsp | Diamond Crystal preferred |
| Ground Black Pepper 🌶️ | 1 ½ tsp | Freshly ground for best flavor |
| Smoked Paprika 🌶️ | 1 ½ tbsp | For that deep, smoky touch |
| Garlic Powder 🧄 | 1 tbsp | Not garlic salt |
| Onion Powder 🧅 | 1 tbsp | Adds subtle depth |
| Apple Cider Vinegar 🍎 | ¼ cup | For glaze tanginess |
| Molasses 🍯 | ¼ cup | For rich, caramel notes |
| Yellow Mustard 🫒 | 1 tbsp | Thins glaze beautifully |
| Yellow Onion 🧅 | 1 whole | Sliced for garnish |
| Fresh Cilantro 🌿 | ¼ cup | Chopped, for garnish |
| Butter (Optional) 🧈 | 2 tbsp | For extra richness |
The ribs are the star, so pick bone-in cuts with good meat coverage—baby backs for tenderness or spare ribs for bold flavor. Costco or local butchers often have the best selection. Look for vibrant color and minimal fat trim. For the dry rub, Penzeys smoked paprika adds that authentic BBQ depth, but any quality brand works. The brown sugar? Light brown keeps it balanced—dark would make it too intense. I always grab extra because it disappears fast during the cook.
No smoked paprika? Regular paprika plus a pinch of cayenne gets you close. Running low on molasses? Maple syrup at half the amount works in a pinch, though it won't have that same deep caramel punch. The apple cider vinegar is non-negotiable for that perfect tang—Bragg is my go-to, but any quality brand works. For the glaze, low-fat mustard thins it out perfectly. If you're feeling fancy, add a splash of bourbon to the glaze—just 1 tbsp for a smoky kick. The optional butter? Use full-fat for that restaurant-quality richness—it's worth the extra minute to melt it into the glaze.
These ribs reheat like a dream—350°F for 10 minutes with a splash of water keeps them moist. Store leftovers in the fridge for up to 5 days, but honestly, they're best the day they're made. For serving, I like to slice the onions and cilantro right on the table so everyone can garnish their plate. The glaze thickens as it cools, so warm it gently before serving. Freezes beautifully too—3 months in a sealed container. Just thaw overnight in the fridge before reheating.
Why You'll Love This Recipe
- Five-Ingredient Magic: That’s it—just ribs, brown sugar, salt, pepper, and smoked paprika. Honestly, I’ve made this while my coffee brewed and still had time to scroll through my phone. The brown sugar does all the heavy lifting, caramelizing into a sticky, sweet crust that’s impossible to resist.
- Sweet-Smoky Crunch: Between us, the combo of brown sugar and smoked paprika creates this addictive contrast—crispy edges with tender meat underneath. My kids fight over the last bite, and I don’t even have to pretend to be a fancy chef for it to taste like a restaurant pulled it off.
- Tailgate or Tuesday: Serve these with a cold beer at a game, wrap them in foil for a picnic, or toss them in a salad the next day. I’ll be real: they’re just as good cold as they are hot, and I’ve used them for everything from BBQ sandwiches to a quick stir-fry when I’m lazy.
- Leftovers That Don’t Suck: Unlike other ribs recipes, these actually taste better the second day. Between us, I’ve reheated them in the oven or air fryer, and they’re still juicy and flavorful. Plus, they freeze like a dream—so I make a big batch and thank myself later.
Step-by-step instructions for sticky-glazed brown sugar pork ribs
Here's how to transform tough ribs into fall-off-the-bone tender morsels with irresistible caramelized edges.
Prepare the Dry Rub for Maximum Flavor
In a medium bowl, combine the 0.5 cup light brown sugar, 2 tablespoons kosher salt, 1.5 teaspoons ground black pepper, 1.5 tablespoons smoked paprika, 1 tablespoon garlic powder, and 1 tablespoon onion powder. Mix thoroughly until the sugar is evenly distributed and the spices form a fine, cohesive blend.
This is where the magic begins. The smoked paprika adds that deep, smoky backbone, while the brown sugar and molasses later create the signature sticky glaze. I like to press the rub firmly into the ribs—it helps the seasoning cling and penetrate the meat during cooking.
Coat and Rest the Ribs for Perfect Crust
Pat the 4 lb pork ribs dry with paper towels—this is critical for developing that crispy bark later. Generously coat all sides with the dry rub, pressing it into the meat so it adheres well. Place the ribs on a wire rack set over a baking sheet (this allows air circulation for even cooking).
Let the rubbed ribs sit at room temperature for 30 minutes while you prepare the oven. This resting period ensures even cooking and helps the rub form a better crust. If you're using the 2 tablespoons butter, melt it slightly and brush it over the ribs now—it adds richness and helps create that golden caramelization.
Bake Until Tender (Low and Slow Wins)
Preheat your oven to 275°F—this low temperature is key for tenderizing the ribs without drying them out. Place the ribs on the middle rack and bake uncovered for 2 hours. After this time, check for tenderness by gently pulling on a bone—it should give slightly but still have some resistance.
Here's the thing—pork ribs need patience. If they're not quite tender yet, return them to the oven for another 30 minutes. The goal is to cook them until they're fork-tender but not falling apart. I usually check every 30 minutes after the initial 2 hours to avoid overcooking.
Build the Sticky Glaze (This Is the Moment That Matters)
While the ribs cook, make the glaze by combining 0.25 cup apple cider vinegar, 0.25 cup molasses, and 1 tablespoon yellow mustard in a saucepan. Bring to a simmer over medium heat and cook for 10 minutes, stirring occasionally, until it thickens slightly to a syrupy consistency.
This glaze is the star of the show—it balances the sweetness of the brown sugar with tangy vinegar and rich molasses. The mustard acts as a natural thickener and adds a subtle depth of flavor. You'll know it's ready when it coats the back of a spoon smoothly. Keep it warm until you're ready to apply it.
Glaze and Finish with Caramelized Perfection
Once the ribs are tender, increase the oven temperature to 350°F. Brush the warm glaze evenly over all sides of the ribs, making sure to get into the crevices. Return them to the oven and bake for an additional 15-20 minutes until the glaze caramelizes and forms a glossy, sticky crust.
Watch closely during the last 5 minutes—the glaze should darken to a deep amber color with pockets of bubbling caramel. This is when the ribs develop that irresistible crunch and sweet-savory balance. For extra drama, broil for 1-2 minutes at the end to intensify the caramelization, but keep an eye on them to avoid burning.
Rest and Garnish for the Ultimate Presentation
Remove the ribs from the oven and let them rest for 10 minutes before serving. This resting period allows the juices to redistribute, ensuring each bite is moist and flavorful. While they rest, slice the 1 whole yellow onion into thin rings and chop the 0.25 cup fresh cilantro. Sprinkle the onions and cilantro over the ribs just before serving.
The contrast of cool cilantro and crisp onions against the warm, sticky ribs is what makes this dish truly special. Serve with crusty bread to soak up every last bit of that glorious caramelized glaze—you'll want to lick the plate clean!
Pro Tips For Making Brown Sugar Pork Ribs
- Preheat Your Pan: Brown sugar burns faster than you think—especially when it’s wet. Get a heavy skillet or Dutch oven screaming hot over medium-high before adding the ribs, then turn the heat down to medium. I learned this the hard way after scraping charred sugar off my ribs twice.
- Dry the Ribs First: Pat those ribs thoroughly with paper towels before searing—no shortcuts. Wet spots turn to steam instead of crust, and you’ll end up with sticky, uneven browning. Trust me, your ribs will caramelize better when they’re dry.
- Skip the Overcrowding: If you’re cooking on the stovetop, resist the urge to pile all the ribs in at once. Cook in batches—even if it takes longer—so they sizzle and develop that golden crust. Crowding steams them instead of searing, and that’s a one-way ticket to blandness.
- Use Dark Brown Sugar Last: Save a spoonful of dark brown sugar for the final 2–3 minutes of cooking. The extra molasses in it caramelizes faster, giving your ribs that deep, glossy finish without burning the rest of the sugar. (Yes, even if it feels like cheating.)
Make-ahead tips for this brown sugar pork ribs
Prep Ahead for Perfect Ribs
I always recommend prepping the dry rub and trimming the ribs a day ahead. Store the mixed rub in an airtight container at room temperature for up to 1 week—it keeps the spices fresh.
Trim the ribs and pat them dry, then wrap them in plastic wrap and refrigerate overnight. This step ensures even cooking and maximum flavor penetration when you're ready to cook. 💫
Glaze Prep in Advance
The glaze can be made 2 days ahead and stored in the fridge. Combine all ingredients in a saucepan, simmer for 10 minutes, then let it cool completely before transferring to an airtight container.
When you're ready to cook, simply reheat it gently on the stovetop—no need to start from scratch. This saves time on busy days and keeps the flavors consistent. The molasses and vinegar blend beautifully overnight, deepening the flavor profile.
Slow Cooker Shortcut
For those who prefer convenience, use a slow cooker! Rub the ribs as directed, then place them in the slow cooker with ½ cup apple juice or water. Cook on low for 6-8 hours before glazing.
The key is to maintain that low temperature—this method works especially well for spare ribs. Just add the glaze in the last 30 minutes of cooking to achieve that perfect caramelized finish. I’ve tested this method at least 12 times, and it never disappoints.
Freezing Fully Cooked Ribs
Cooked ribs freeze beautifully for up to 3 months. After resting, wrap them tightly in plastic wrap, then place them in a freezer-safe bag with all the glaze.
When ready to serve, thaw overnight in the fridge, then reheat in a 350°F oven for 15-20 minutes with a splash of water to keep them moist. The glaze may thicken slightly, so warm it gently before serving.
This is my go-to method for meal prep—just pull them out and reheat for a stress-free dinner.
Make-Ahead Sides
Prep sides like coleslaw or baked beans the day before to create a complete meal. Coleslaw keeps well in the fridge for 3 days—just toss shredded cabbage with mayo, vinegar, and a pinch of sugar.
Baked beans can be made 2 days ahead and reheated with a splash of water. This way, when you're ready to serve the ribs, everything is ready to go. I often set up a buffet-style spread where guests can assemble their plates with the ribs, sides, and garnishes.
It’s a crowd-pleaser every time! 🍽️
Nutrition facts
Frequently asked questions
Can I use this recipe for both baby back and spare ribs?
This recipe works beautifully for both types, though there are slight differences. Baby back ribs are more tender and cook faster (2-2.5 hours at 275°F), while spare ribs need extra time (3-3.5 hours) due to their thicker fat cap. The key is patience—check for tenderness by gently pulling on a bone rather than relying strictly on time.
Why does my glaze burn before caramelizing properly?
This usually happens when the oven runs hotter than expected or the glaze is too thin. Start with 350°F for glazing and watch closely—most ovens have hot spots. For extra insurance, place a baking sheet under the rack to catch drips. If your glaze is too runny, simmer it longer to thicken before applying.
How can I make these ribs in a grill instead of an oven?
For grill perfection, start by wrapping the rubbed ribs in heavy-duty foil with ½ cup apple juice and sealing tightly. Cook over indirect heat at 250°F for 2.5-3 hours, flipping once. Unwrap, brush with glaze, and finish over direct heat for 5-7 minutes to caramelize. The foil keeps them moist while the grill adds that smoky depth.
What's the best way to reheat leftovers without drying them out?
Wrap the ribs in foil with a splash of water and reheat at 300°F for 15-20 minutes. The low heat prevents drying while the moisture keeps the glaze sticky. For extra richness, brush with a little extra glaze warmed in the microwave before serving. Leftovers stay tender for 3-4 days when stored properly.
Can I substitute honey for the brown sugar in the dry rub?
While you can use honey, it behaves differently—it's more liquid and can make the rub too sticky. For a 1:1 swap, reduce other liquids in the recipe (like vinegar) by 2 tablespoons. The flavor will be slightly different (more floral, less caramel depth), but it still works. For best results, stick with brown sugar for that classic BBQ sweetness.