
Main Courses
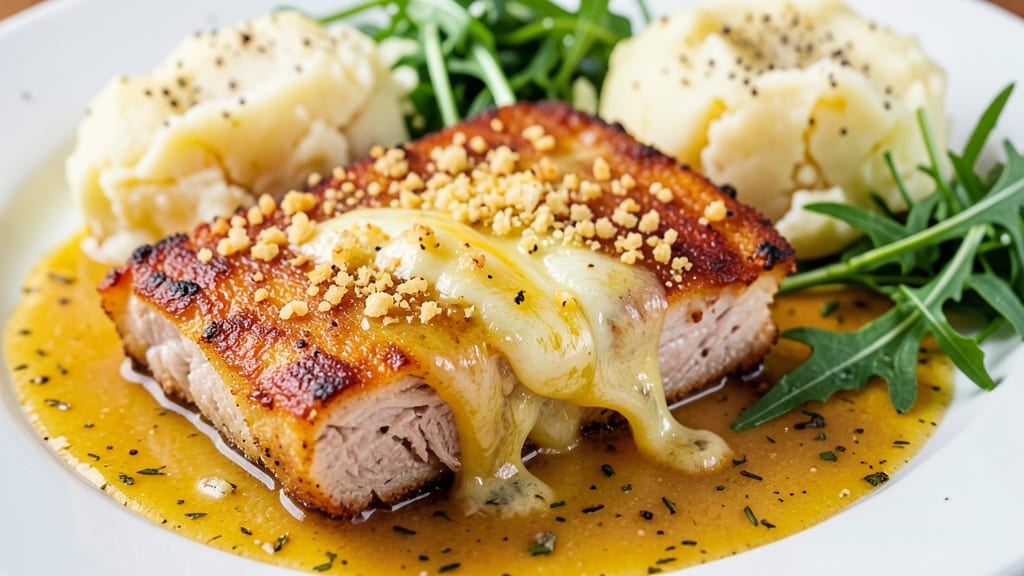
This cheesy pork cutlet recipe transforms simple ingredients into a restaurant-worthy dish with a crispy golden crust and pockets of melted cheese. 🔥 I developed this technique after years of perfecting schnitzel-style cutlets, adding the cheesy twist that makes it unforgettable.
The secret lies in a double breading method that creates that perfect crunch while keeping the interior juicy and tender.
The process starts with pounded pork cutlets coated in seasoned flour, then dipped in beaten egg and breadcrumbs—not once, but twice. This double breading ensures a crispy exterior that shatters with every bite while trapping melted cheese inside.
I use a mix of sharp cheddar and mozzarella for the perfect balance of tangy and creamy flavors that ooze out as soon as you cut in.
What you'll end up with is a cutlet that's golden brown on the outside, tender and juicy on the inside, with melted cheese hearts peeking through the crust. The aroma alone will have everyone gathering around the table, and the first bite delivers that perfect combination of textures and flavors.
This recipe is foolproof for beginners but refined enough to impress even seasoned cooks.
Serve with a side of roasted potatoes or a fresh green salad to balance the richness. The crispy cutlets hold up beautifully, making this an ideal dish for family dinners or special occasions. Let's get cooking—this one's a game-changer for pork lovers everywhere.
Ingredients for cheesy pork cutlet
These 12 ingredients create the ultimate crispy-cheesy pork cutlet experience—restaurant-quality at home!
| Ingredient | Amount | Notes |
|---|---|---|
| Pork Cutlets 🥩 | 1 ½ lb | Boneless, skinless, pounded thin |
| All-Purpose Flour 🌾 | 1 ½ cups | For first breading layer |
| Large Eggs 🥚 | 2 whole | Beaten for egg wash |
| Panko Breadcrumbs 🍞 | 2 cups | For crispy second layer |
| Sharp Cheddar Cheese 🧀 | 1 cup | Shredded, for cheesy filling |
| Mozzarella Cheese 🧀 | 1 cup | Shredded, for creamy melt |
| Olive Oil 🫒 | ½ cup | For frying cutlets |
| Salt 🧂 | 1 tsp | Kosher or sea salt |
| Black Pepper 🌶️ | ½ tsp | Freshly ground preferred |
| Garlic Powder 🧄 | ½ tsp | For seasoning flour |
| Paprika 🌶️ | ½ tsp | Smoked for extra flavor |
| Lemon Juice 🍋 | 1 tbsp | Brightens the crust |
The pork cutlets are the star—look for thin, even slices at the butcher counter or pre-sliced pork loin. Costco or Whole Foods often carry the best quality, but any grocery store's pork loin works. Pound them to ¼-inch thickness for even cooking. The double breading is key: first with seasoned flour, then egg wash, and finally panko for that shatteringly crispy crust. Don't skip the panko—regular breadcrumbs won't give you that golden crunch. For the cheese, sharp cheddar adds tang, while mozzarella keeps it creamy. Pre-shredded works, but freshly grated melts better—worth the extra minute.
No panko? Italian breadcrumbs with an extra pinch of salt work in a pinch. Short on mozzarella? Gruyère or provolone both melt beautifully. The lemon juice might seem odd, but it brightens the crust and balances the richness—trust me on this. For the flour seasoning, I use garlic powder and smoked paprika, but Italian seasoning works too. Want extra crispiness? Double the panko layer on the second coat. And if you're nervous about frying, use an air fryer at 375°F for 8-10 minutes—same crispy results with less mess.
These cutlets are best served immediately—the cheese stays gooey and the crust stays crisp. But if you must reheat, 350°F oven for 5-7 minutes works best. Store leftovers in the fridge for up to 3 days, but honestly? They disappear faster than that. For meal prep, freeze cooked cutlets (without reheating) for up to 2 months—just thaw and crisp in the oven. The secret to keeping them crispy? Paper towels under them in the fridge to absorb moisture. Leftovers reheat beautifully, but nothing beats fresh-off-the-fryer perfection.
Why You'll Love This Recipe
- No-Fuss Crispy Magic: I swear by this method—just flour, egg, panko, and cheese. No fancy techniques, no stress. The panko gives that perfect crunch without needing a deep fryer or even a ton of patience.
- Cheese Pulls All Night: That sharp cheddar melts into gooey perfection inside while the crust stays golden. Honestly, the first time I bit into one still warm, I immediately grabbed another. It’s the kind of dish that makes you forget about salads for a week.
- Weeknight Hero: Between us, this is my go-to when I’m starving but can’t be bothered to cook for hours. It’s ready in one pan, feeds four, and leaves my kitchen cleaner than takeout. (Yes, even on a Tuesday night.)
- Budget-Friendly Leftovers: Pork cutlets stretch further than you’d think, and the cheesy coating makes them feel like a splurge. I’ll often double the batch—freeze half, then reheat for lazy lunches or game-day snacks. Zero guilt, all flavor.
Step-by-step instructions for cheesy pork cutlet recipe
Here's how we'll build those irresistible golden crusts with gooey cheese centers—crispy perfection every time.
👨🍳 Step 1: Pound and Season the Pork Cutlets
Place each 1.5 lb pork cutlet between two sheets of plastic wrap. Using a meat mallet, pound them to an even ¼-inch thickness—this ensures even cooking and maximum crispiness. Real talk: don't skip this step, or you'll end up with uneven doneness.
Season both sides generously with 1 tsp salt, ½ tsp black pepper, ½ tsp garlic powder, and ½ tsp paprika. I like to press the spices into the meat so they adhere well. Let the seasoned cutlets rest at room temperature for 10 minutes while you prep the breading station. This resting time helps the meat cook more evenly.
🥘 Step 2: Create the Breading Stations
In a shallow bowl, combine the 1.5 cups all-purpose flour, ½ tsp garlic powder, ½ tsp paprika, and 1 tbsp lemon juice. The lemon juice brightens the crust and prevents the flour from getting gummy. Mix well so every particle of flour is evenly coated with seasoning.
In another bowl, beat the 2 whole large eggs until just combined but still slightly lumpy. This creates a light, airy coating that helps the breadcrumbs stick. In a third bowl, place the 2 cups panko breadcrumbs—these will give us that signature crispy texture. Here's the thing—don't use regular breadcrumbs, as they'll make the crust soggy instead of crunchy.
🍳 Step 3: Build the Perfect Crust Layer by Layer
Heat ½ cup olive oil in a large skillet over medium heat until it shimmers but doesn't smoke. Working with one cutlet at a time, dredge it in the flour mixture, pressing gently to adhere. Shake off any excess, then dip into the egg wash, letting any drips fall back into the bowl. Finally, press the cutlet into the panko breadcrumbs, coating all sides thoroughly.
Place the breaded cutlet in the hot oil and cook for 3-4 minutes per side until golden brown and crispy. You'll know it's ready when the crust releases easily from the pan and the internal temperature reaches 145°F. Transfer to a wire rack to drain excess oil, then repeat with the remaining cutlets. Keep them warm in a 200°F oven while you prepare the cheese filling.
🥘 Step 4: Assemble and Melt the Cheese Hearts
In a small bowl, combine the 1 cup shredded sharp cheddar cheese and 1 cup shredded mozzarella cheese. The cheddar adds sharp flavor while the mozzarella creates that perfect melt. For each cutlet, create a small well in the center of the breaded surface and fill it with about 2 tablespoons of the cheese mixture. Press the cheese gently into the well so it stays in place during frying.
Return the cutlets to the skillet over medium heat and cook for an additional 2-3 minutes per side until the cheese is fully melted and bubbly. Watch closely—this is the moment that matters: you want the cheese to be completely melted but the crust to stay crispy, not soggy. If the crust starts to soften, reduce the heat slightly to maintain that perfect texture.
⏰ Step 5: Rest and Serve Immediately
Transfer the cheesy pork cutlets to a serving platter and let them rest for 2-3 minutes. This brief resting period allows the cheese to set slightly, making it easier to serve without losing those gooey centers. The cutlets should be deep golden brown on the outside with melted cheese hearts peeking through the crispy crust.
Serve immediately while the crust is still crispy and the cheese is molten. I like to pair these with a simple arugula salad or roasted vegetables to balance the richness. Don't wait too long to serve—these cutlets are best enjoyed right away when the contrast between the crispy crust and melty cheese is at its peak!
Pro Tips For Making Cheesy Pork Cutlet
- Pound Pork Evenly: I learned this the hard way—uneven thickness means uneven cooking. Use a meat mallet or rolling pin to flatten each cutlet to exactly ¼-inch thickness, or they’ll dry out on the outside while staying cold inside. Trust me, your patience here pays off.
- Salt the Panko: Skip the pre-seasoned panko—it’s overkill. Toss your plain panko with ½ teaspoon of salt and a pinch of garlic powder before mixing it with the cheese. This makes a real difference in flavor without making the crust soggy.
- Press, Don’t Drown: When breading, press the panko hard into the egg-washed cutlet—don’t just sprinkle and hope. Use the back of a fork or your palm to pack it tight, or the coating will slide off when frying. (Yes, it looks like you’re assaulting the meat, but it works.)
- Fry in Batches: Crowding the pan drops the temperature fast, and you’ll end up with greasy, unevenly cooked cutlets. Fry two at most—wait until the first batch is golden and crispy before adding more. Your future self will thank you for not rushing this.
Common mistakes when making your cheesy pork cutlet
Skipping the Pounding
I can't stress enough how critical this step is—skipping the pounding is the #1 mistake I see beginners make. Pork cutlets should be ¼-inch thick for even cooking.
If you leave them too thick, the outside will burn before the inside cooks through, and you'll end up with a tough, uneven bite. Use a meat mallet or rolling pin between plastic wrap for best results. 💪
Overcrowding the Pan
This is a surefire way to end up with soggy cutlets instead of crispy ones. Overcrowding the pan lowers the oil temperature, causing the breading to absorb oil instead of staying crisp.
Cook only 1-2 cutlets at a time in the pan, and keep the remaining ones warm in a 200°F oven while you finish. I've seen home cooks try to fry four cutlets at once—don't be that person!
Using Wrong Breadcrumbs
Regular breadcrumbs will make your cutlets soggy, not crispy. Panko breadcrumbs are the secret weapon here—they're light and airy, designed to create that shatteringly crispy crust.
If you're out of panko, Italian-style breadcrumbs with an extra pinch of salt work in a pinch, but nothing beats the real deal. Trust me, your taste buds will notice the difference. 🍞
Cheese Melting Too Fast
Adding cheese too early or cooking at too high heat will cause it to ooz out everywhere instead of staying contained. The solution? Cook the cutlets without cheese first until golden, then add the cheese mixture and cook just 2-3 minutes per side on medium heat.
This gives you control over the melt—no more cheese explosions! I've had to scrape cheese off my stove more times than I'd like to admit.
Not Resting the Meat
Letting the cutlets rest for 10 minutes before cooking is crucial for even cooking. Cold meat releases moisture unevenly, leading to steam pockets that make the crust soggy. Room temperature meat cooks more uniformly.
Also, rest the finished cutlets 2-3 minutes before serving—this helps the cheese set slightly so it doesn't run all over your plate when you cut in.
Using Pre-Shredded Cheese
Pre-shredded cheese contains anti-caking agents that prevent it from melting smoothly. For perfectly gooey cheese, always use freshly grated sharp cheddar and mozzarella. The extra effort is worth it—you'll get that restaurant-quality melt instead of clumpy, dry cheese.
If you must use pre-shredded, at least pat it completely dry with a paper towel first to remove excess moisture. 🧀
Nutrition facts
Frequently asked questions
Can I use chicken or turkey instead of pork?
This technique works beautifully with chicken or turkey cutlets, though pork has the best natural fat content for juiciness. For poultry, pound to ¼-inch thickness and cook to an internal temp of 165°F instead of 145°F. The double breading method creates the same crispy crust, but watch poultry closely—it cooks faster than pork.
What's the best way to reheat leftovers?
For crispy reheats, place cutlets on a baking sheet and warm in a 400°F oven for 5-7 minutes. To restore crispiness, broil for 1-2 minutes at the end. For air fryer reheats, use 375°F for 3-4 minutes. Never microwave—it turns the crust soggy. The cheese will soften but won't melt completely.
Can I make these ahead of time?
You can prep components ahead: pound and season cutlets up to 2 days ahead, store in the fridge. For the breading, mix dry ingredients separately and combine fresh before cooking. Assemble completely and freeze uncooked cutlets (without cheese) for up to 1 month. Cook from frozen, adding 1 extra minute per side. Never freeze with cheese added—it won't melt properly when reheated.
What cheese alternatives work best?
For a creamy melt, try mozzarella + fontina or provolone. For sharp flavor, swap cheddar for pepper jack or gouda. Vegan option? Use dairy-free mozzarella and nutritional yeast for a cheesy taste. Always grate fresh—pre-shredded contains anti-caking agents that prevent proper melting.
How do I keep the crust crispy?
Three keys: 1) Cook in batches—never overcrowd the pan. 2) Use medium heat—too hot burns the crust before the inside cooks. 3) Drain on a wire rack—not paper towels—to remove excess oil. For extra crispiness, broil for 1 minute at the end. The secret? Panko breadcrumbs—they absorb less moisture than regular crumbs.