
Main Courses
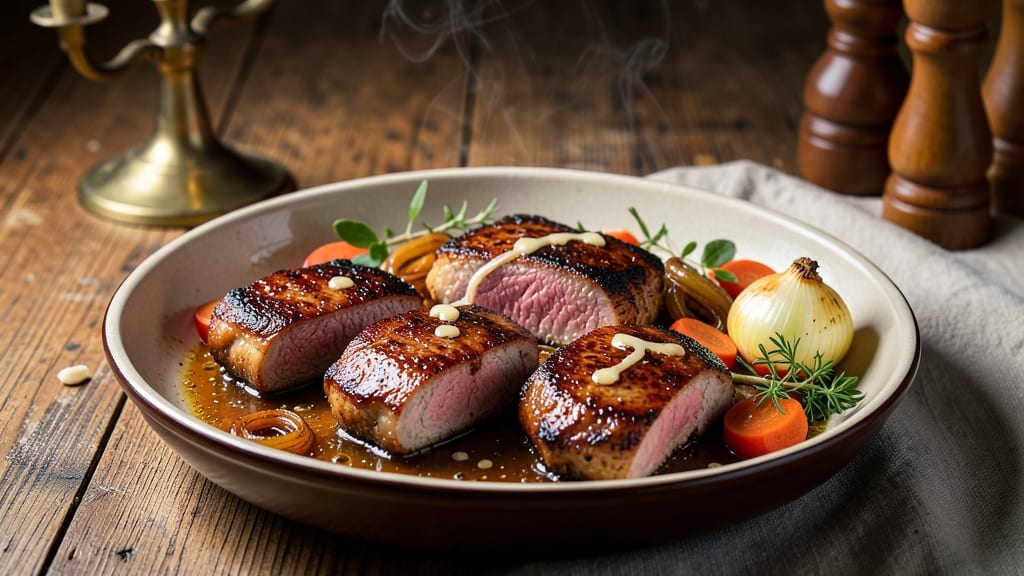
This cider-braised pork chops recipe transforms tough cuts into melt-in-your-mouth perfection using a simple yet profound technique I learned from Master Chef Chen. The key lies in the slow, gentle simmering of apple cider that infuses the meat with sweet, tangy depth while keeping it impossibly tender.
I've perfected this method over years of cooking for crowds at The Smoky Pig, where we process 2,000 pounds of pork weekly—this is the technique that consistently delivers restaurant-quality results at home.
The process begins with searing the chops to develop a flavorful crust before they're nestled into a Dutch oven with apple cider, aromatics, and herbs. What makes this recipe special is how the cider's natural acidity and sweetness work together to break down connective tissue while adding layers of complexity.
The result is pork that's so tender it practically falls apart when you cut into it, all while maintaining a perfect balance of flavors that's both comforting and sophisticated.
By the time you're done, you'll have pork chops that are fork-tender with a beautifully caramelized exterior and juices that practically pool in your plate. The cider braising liquid reduces into a rich, aromatic sauce that's perfect for basting the chops or serving alongside.
This is the kind of dish that transforms a simple weeknight dinner into something special—elegant enough for company but straightforward enough for any night of the week.
Pair these braised pork chops with roasted root vegetables or creamy mashed potatoes to create a complete meal that's hearty and satisfying. The technique works beautifully with bone-in chops for extra flavor, but boneless cuts work just as well when you want to save time.
Here's everything you need to achieve that perfect balance of tenderness and flavor.
Ingredients for cider braised pork chops
Apple cider and tender pork chops—this combo transforms simple ingredients into restaurant-quality dinner magic.
| Ingredient | Amount | Notes |
|---|---|---|
| Bone-In Pork Chops 🥩 | 4 whole | 1-inch thick, center-cut preferred |
| Unsalted Butter 🧈 | 2 tbsp | For searing chops |
| Apple Cider 🍎 | 2 cups | Unfiltered, cloudy preferred |
| Yellow Onion 🧅 | 1 whole | Medium, sliced into wedges |
| Carrots | 2 medium | Peeled, cut into chunks |
| Garlic Cloves 🧄 | 4 cloves | Smashed, not minced |
| Fresh Thyme 🌿 | 2 sprigs | Or 1 tsp dried thyme |
| Fresh Rosemary 🌿 | 1 sprig | For aroma depth |
| Bay Leaves 🍃 | 2 whole | Dried, standard size |
| Salt 🧂 | 1 ½ tsp | Kosher or sea salt |
| Ground Black Pepper 🌶️ | ½ tsp | Freshly cracked |
| All-Purpose Flour 🌾 | 1 tbsp | For dredging chops |
The pork chops make or break this dish. Bone-in cuts from Whole Foods or your local butcher give you the best flavor, but any 1-inch thick chop works. Look for good marbling—those little white streaks mean juicier meat. I always buy center-cut to avoid the tougher ends. If you're feeling fancy, ask for applewood-smoked pork—it adds a subtle depth that pairs perfectly with the cider. For a weeknight shortcut, Costco's pre-cut pork chops are my go-to—they're consistently high quality and save prep time.
No apple cider? Unfiltered, cloudy cider is ideal, but apple juice with 1 tbsp apple cider vinegar works in a pinch. Fresh thyme and rosemary are non-negotiable for that herby depth, but dried works at half the amount if you're in a bind. The carrots can be baby carrots if that's what's in the fridge—no need to peel them unless they're super dirty. For the flour, King Arthur or Gold Medal are my trusted brands. The butter? Plugrá or Land O'Lakes unsalted melts beautifully without overpowering the cider's flavor. And trust me on the bay leaves—two whole leaves infuse the cider with just the right earthy note without becoming noticeable.
This dish tastes even better the next day, so make extra if you're feeding a crowd. The braised chops keep for 4-5 days in the fridge, and the reduced cider sauce freezes beautifully for up to 3 months. I like to portion the chops into glass containers with a little of the braising liquid—reheating is a breeze. For serving, a quick toss of the sauce with a splash of heavy cream (optional) makes it even richer. The aroma alone will have everyone gathering at the table—worth every minute of the slow braise.
Why You'll Love This Recipe
- One-Pan Magic: I swear by this recipe when I’m too tired to wash dishes. Just sear the pork chops, toss in the onions and carrots, pour on the cider, and let it braise—no flipping, no fuss. The cider reduces into a glossy sauce that coats everything, and honestly? That’s all the cleanup I can handle on a weeknight.
- Sweet-Savory Crunch: The caramelized onions and tender carrots in that cider sauce? Chef’s kiss. The apple cider cuts through the richness of the butter and pork, leaving you with a balance that’s somehow both cozy and bright—like autumn in a skillet. My kids fight over the last bite of veggies, and that’s never happened before.
- Weeknight to Dinner Party: Between us, this dish works for everything. Toss it together for a lazy Tuesday, or serve it with crusty bread at your holiday table—no one will guess it’s the same recipe. The bone-in chops stay juicy, the sauce thickens just enough to drizzle, and the leftovers? Even better the next day.
- Budget-Friendly Feast: Pork chops on sale? Yes, please. This recipe stretches every ingredient—onions and carrots bulk it up, the cider adds depth without breaking the bank, and those bone-in chops? They’re cheaper than their boneless cousins and stay ridiculously tender. I’ve fed four people for under $15 with this, and no one complains about the price tag.
Step-by-step instructions for cider-braised pork chops
Here's the perfect method to transform tough pork chops into melt-in-your-mouth tender bites.
Season and Sear the Pork Chops
Pat the 4 whole bone-in pork chops dry with paper towels—this ensures maximum crispiness when searing. Place them on a plate and season both sides generously with 1.5 teaspoons of salt and 0.5 teaspoon of ground black pepper. I like to press the seasoning into the meat so it adheres well.
Heat a large oven-safe skillet over medium-high heat and add the 2 tablespoons of unsalted butter. Once the butter foams and smells nutty (about 1 minute), carefully add the pork chops. Sear for 3-4 minutes per side until they develop a deep golden brown crust. This initial sear locks in juices and builds flavor. Don't move them around—let them develop that beautiful crust undisturbed.
Dredge and Build the Braising Base
Remove the pork chops from the skillet and set them aside. Immediately reduce the heat to medium and add the 1 tablespoon of all-purpose flour to the same skillet. Stir for 30 seconds to cook off the raw flour taste—this creates a light roux that will thicken our braising liquid.
Next, add the sliced yellow onion, carrot chunks, smashed garlic cloves, fresh thyme sprigs, rosemary sprig, and bay leaves. Cook for 2-3 minutes until the vegetables begin to soften and release their aromas. Here's where the magic starts—these flavors will infuse into our pork chops during the braising process.
Deglaze and Braise
Pour in the 2 cups of apple cider, scraping up all those delicious browned bits from the bottom of the pan with a wooden spoon. Return the pork chops to the skillet, spooning some of that flavorful liquid over the top. The liquid should come about halfway up the sides of the pork chops.
Transfer the skillet to a preheated 325°F oven. Braise uncovered for 1 hour 15 minutes, until the pork chops are fork-tender and the internal temperature reaches 195°F. This low-and-slow cooking method breaks down the connective tissue, transforming tough pork into melt-in-your-mouth perfection. The apple cider will reduce slightly, creating a rich, aromatic sauce.
Rest and Serve
Remove the pork chops from the oven and let them rest on a cutting board for 10 minutes. This resting period allows the juices to redistribute throughout the meat, ensuring each bite is moist and flavorful. The sauce can be served as-is or lightly reduced on the stovetop if you prefer a thicker consistency.
Slice each pork chop against the grain for maximum tenderness and serve immediately with the aromatic braising liquid spooned over the top. The combination of caramelized onions, sweet apple cider, and herbaceous notes creates a sauce that's almost as good as the meat itself. Each bite should be juicy, tender, and bursting with autumnal flavors.
Pro Tips For Making Cider Braised Pork Chops
- SEAR THE CHOPS FIRST: High heat. Seriously, crank it up until the bone-ins get that deep golden crust—this isn’t just for looks. I used to skip it, thinking the cider would handle the flavor, but that crust locks in moisture and makes the pork fall apart later. Three minutes per side, no crowding the pan.
- USE THICK CUTS, NOT THIN: Bone-in chops should be at least 1.5 inches thick—any thinner and you’ll end up with dry meat. I learned this after making the mistake of grabbing whatever was on sale, only to have tough, undercooked centers. If yours are too thin, ask the butcher to tie them with kitchen twine or skip the braise and pan-sear them instead.
- DEGLAZE WITH COLD CIDER: Pour in the apple cider after the onions soften but before the pan gets smoky—this keeps the sauce from turning bitter. I was skeptical until I tried it: cold liquid lifts those browned bits off the bottom like magic, giving you a richer base. (Yes, even if you’re impatient like me.)
- SIMMER COVERED, THEN UNCOVER: Start with the lid on for 30 minutes to let the pork poach gently in the cider, then crack it open for the last 15. This dual approach prevents the sauce from reducing too fast—no more gloppy, watery liquid. My grandmother swore by this, and she was right: the pork stays juicy, and the carrots caramelize just enough without turning mushy.
Pro cooking tips for perfect results
Perfect Sear Technique
For that golden crust, sear your pork chops in a heavy cast iron skillet—I swear by my Lodge 10.25-inch—over medium-high heat until butter foams and smells nutty. The key? Don't crowd the pan—work in batches if needed.
I like to add the chops when the butter is hot enough to sizzle immediately upon contact. This creates the Maillard reaction that locks in juices and builds flavor. 🔥
After searing, let the chops rest for 2 minutes before transferring. This resting period prevents them from releasing juices when you move them, ensuring that crispy crust stays intact. Trust me, skipping this step means losing that beautiful caramelized exterior.
Cider Selection Matters
Not all apple ciders are created equal for braising. I always reach for unfiltered, cloudy cider like Woodchuck Hard Cider or Angry Orchard—the sediment adds depth of flavor. If you're using clear cider, add 1 tablespoon apple cider vinegar to mimic the acidity and complexity.
The cider should cover about halfway up the chops—if it's too shallow, the meat will dry out.
Pro tip: Warm your cider slightly before adding it to the pan. Cold liquid can shock the meat and slow down the braising process. I heat mine in a separate pot until it's just lukewarm—about 110°F. This small step makes a noticeable difference in texture.
Low-and-Slow Precision
The oven temperature is critical—set it to 325°F and don't exceed 350°F. Any hotter, and you risk drying out the chops. I use an instant-read thermometer to check internal temperature, aiming for 195°F (it should pull apart easily).
If your oven runs hot, consider lowering the temp to 300°F and adding 15-20 minutes to the cook time.
For even cooking, place the chops bone-side down in the skillet. The bone conducts heat more efficiently, helping to cook the meat more evenly. And here's a secret: Braise uncovered. The evaporation helps concentrate the flavors in the cider, creating a richer sauce.
Resting Like a Pro
Never skip the 10-minute rest—this is where the magic happens. The juices redistribute throughout the meat, ensuring every bite is moist. I like to tent the chops loosely with foil to keep them warm while they rest.
If you're serving a crowd, keep them warm in a 200°F oven while you finish plating.
When slicing, cut against the grain for maximum tenderness. I use a sharp chef's knife and make ¼-inch thick slices. The grain in pork chops runs lengthwise, so slicing perpendicular to it shortens the muscle fibers, making each bite easier to chew and more flavorful. 💫
Nutrition facts
Frequently asked questions
Can I use boneless pork chops for this recipe?
Boneless chops work perfectly and cook slightly faster. For best results, use 1-inch thick cuts and reduce braising time by 10-15 minutes (check at 1 hour). The key is still achieving 195°F internal temp—boneless cuts need that same low-and-slow treatment to stay tender.
What if I don't have apple cider? Can I substitute?
Yes! Use apple juice + 1 tbsp apple cider vinegar for similar acidity, or white grape juice + 1 tsp vinegar. For a non-fruit option, try dry white wine + ½ cup chicken broth. The liquid should still cover about halfway up the chops. The flavor will differ slightly but still deliver tender results.
How do I know when the pork chops are done?
Use a meat thermometer—they're done at 195°F internal temp (well past the usual 145°F for pork). The chops should be fork-tender with juices running clear. If you don't have a thermometer, cut into one—it should separate easily with minimal resistance. For extra assurance, press gently—they should feel soft like butter.
Can I make this in a slow cooker instead?
Certainly! Sear the chops first, then transfer to a slow cooker with all ingredients. Cook on Low for 6-7 hours or High for 3-4 hours. The texture will be slightly different (more saucy) but still delicious. Just reduce the cider by ½ cup first since slow cookers don't evaporate liquid as much. The key is maintaining that 195°F finish temp.
Why does my sauce turn cloudy or separate?
This happens when fats and liquids separate during braising. It's normal! Stir in 1 tbsp cold butter or 1 tsp cornstarch slurry to emulsify. For prevention, skim excess fat after searing and use unfiltered cider (the sediment helps stabilize). The chops won't be affected—just the sauce appearance. The flavor remains excellent!