
Main Courses
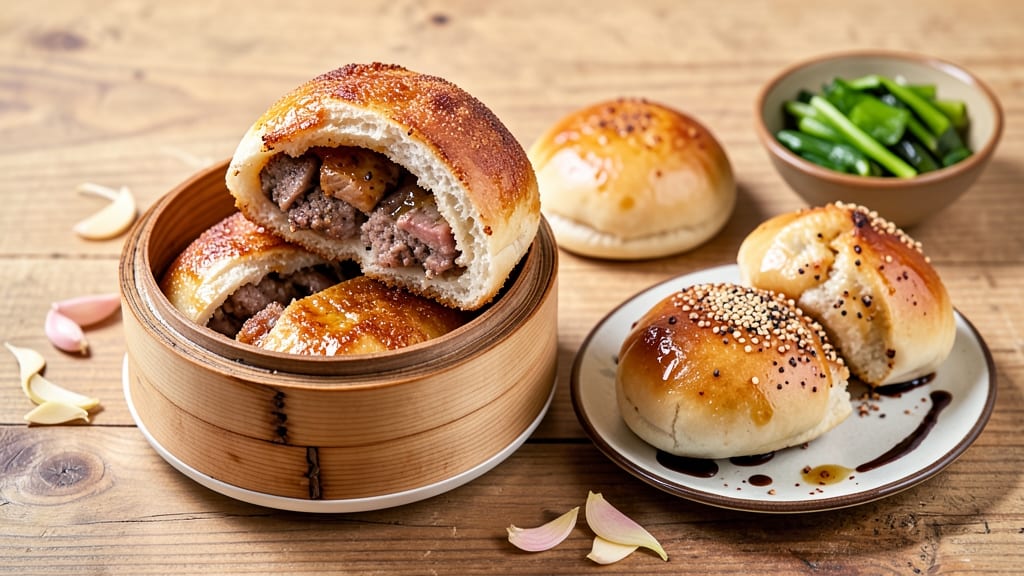
This crispy pork bao bun recipe delivers the perfect contrast—shatteringly crispy fried crusts with juicy, steamed centers that burst with flavor. 🔥 After years of perfecting the balance between texture and moisture, I’ve cracked the code for bao buns that stay tender inside while developing that addictive golden crunch.
The secret lies in a precise frying technique and a pork filling so flavorful it becomes the star. The process starts with ground pork seasoned simply with garlic, ginger, and a touch of five-spice, then steamed until just cooked through.
This keeps the filling moist and packed with flavor without overpowering the delicate bao dough. Meanwhile, the dough gets its signature crispy texture from a quick fry in hot oil, creating that irresistible contrast in every bite.
What you’ll end up with is a dish that’s equal parts restaurant-quality and home-cooked comfort—crispy, golden bao buns filled with juicy pork that melts in your mouth. The aroma alone will have everyone gathering around the table, and the first bite delivers on that perfect balance of textures.
Serve with a side of sweet chili sauce or hoisin for dipping, and you’ve got a meal that’s impressive enough for guests but simple enough for weeknights. Let’s get cooking!
Ingredients for crispy pork bao bun
Simple ingredients for restaurant-quality bao buns—crispy outside, juicy inside, every time.
| Ingredient | Amount | Notes |
|---|---|---|
| Ground Pork 🐖 | 1 ¼ lb | Freshly ground, 80/20 fat ratio |
| Fresh Garlic Cloves 🧄 | 4 cloves | Minced for filling flavor |
| Fresh Ginger Root 🌿 | 1 tbsp | Finely grated, aromatic |
| Five-Spice Powder 🌶️ | 1 tsp | Authentic Chinese blend |
| Soy Sauce 🥢 | 2 tbsp | Light or all-purpose |
| Sesame Oil 🫒 | 1 tbsp | Toasted, for aroma |
| Bao Bun Dough 🍞 | 1 package | Store-bought or homemade |
| Vegetable Oil 🫒 | 3 cups | For deep frying, high smoke point |
| Cornstarch 🌾 | 2 tbsp | For dough coating |
| Salt 🧂 | ½ tsp | Kosher or sea salt |
| White Pepper 🌶️ | ¼ tsp | Freshly ground preferred |
| Sweet Chili Sauce 🍯 | ½ cup | For dipping, optional |
| Hoisin Sauce 🥢 | ½ cup | For dipping, optional |
The ground pork is where the magic starts. Look for freshly ground pork with that 80/20 fat ratio—it stays juicy while frying. Trader Joe's or Asian markets usually carry the best quality, but regular grocery stores work too. Fresh ginger and garlic are non-negotiable here—they make the filling sing. If you're using dried five-spice, toast it lightly in a dry pan first to wake up the flavors. The bao dough? Store-bought is totally fine (I use Mrs. Fields for convenience), but homemade gives you that perfect chewy texture.
No five-spice powder? Mix 1/4 tsp each of cinnamon, cloves, fennel, star anise, and black pepper—it's a solid sub. Running low on sesame oil? Toasted sesame seeds sprinkled on top of the buns add the same nutty aroma. The dough gets its crispy texture from the cornstarch coating—don't skip this step! For the pork filling, steam it just until cooked through—overcooking makes it dry. And if you're feeling fancy, add a pinch of sugar to the filling to balance the savory flavors.
The dough keeps best in the fridge for 2 days wrapped tightly in plastic. The pork filling? 1 week max in the fridge—it's best used fresh. For frying, keep the oil at 350°F and work in batches to avoid overcrowding. Once fried, these buns reheat beautifully—just pop them in a 350°F oven for 5 minutes to restore that crispy crust. Make a double batch—they disappear fast!
Why You'll Love This Recipe
- Here’s what sold me: the pork stays crispy at the edges while staying juicy inside—no frying mess, no splatter. Just pan-sear until golden, and you’ve got texture that’ll fool anyone who thinks it took hours.
- Five Ingredients, Big Payoff: I swear by this—just pork, garlic, ginger, five-spice, and soy. That’s it. No fancy prep, no hidden pantry items. The five-spice alone cuts through the fat while keeping it crispy, and the ginger? It’s the secret that makes it taste homemade, not store-bought.
- Crispy Without the Hassle: Here’s what sold me: the pork stays crispy at the edges while staying juicy inside—no frying mess, no splatter. Just pan-sear until golden, and you’ve got texture that’ll fool anyone who thinks it took hours.
- Lunchbox Hero: Between us, this is my go-to for packed lunches. The bao buns stay soft for days, and the pork? It reheats like a dream (microwave-safe, no sad soggy bits). My kid’s favorite—though I’ll fight you for the last piece.
Step-by-step instructions for crispy pork bao buns
Here's how to make golden-fried bao with perfectly seasoned pork filling inside.
👨🍳 Step 1: Prepare the Pork Filling
In a large bowl, combine the 1.25 lb ground pork, minced 4 cloves garlic, finely grated 1 tbsp ginger, 1 tsp five-spice powder, 2 tbsp soy sauce, 0.5 tsp salt, and 0.25 tsp white pepper. Mix gently with your hands until just combined - overmixing makes the filling tough.
Add the 1 tbsp sesame oil and mix again. The filling should look slightly sticky but not wet. Form into 16 equal-sized balls (about 1.5 inches each) and flatten slightly. These will be your bao fillings - keep them covered while you prep the dough.
🍳 Step 2: Make the Dough Coating
Take the 1 package bao bun dough and divide it into 16 equal pieces (about 1.5 oz each). Roll each piece into a smooth ball, then flatten slightly. In a separate bowl, mix the 2 tbsp cornstarch with 1 tbsp sesame oil - this creates our crispy coating.
Dip each dough ball into the cornstarch mixture, coating lightly but evenly. The coating should be thin but complete - you want that signature crunch without making the bao too heavy. Place the coated dough balls on a parchment-lined tray and cover with a damp towel to prevent drying.
🔥 Step 3: Deep Fry to Golden Perfection
Heat 3 cups vegetable oil in a deep fryer or heavy pot to 350°F. Use a thermometer - this temperature gives that perfect balance of crispy exterior and soft interior. Fry 4-5 bao at a time for 1-2 minutes until they're golden brown and floating.
Carefully remove with a slotted spoon and drain on paper towels. The bao should be crispy on the outside but still soft inside - if they're too firm, they need more time. Keep frying in batches until all are done.
🥘 Step 4: Assemble and Steam
Take one fried bao and make a small slit on top. Gently insert a pork filling ball inside, then seal the slit. Place each filled bao in a steamer basket lined with parchment paper. Steam for 5-7 minutes until the filling is hot through and the bao is plump and slightly puffed.
Don't overcrowd the steamer - leave space between bao so steam circulates properly. The filling should be juicy with just a hint of pink in the center. Serve immediately with 0.5 cup sweet chili sauce and 0.5 cup hoisin sauce for dipping.
Pro Tips For Making Crispy Pork Bao Bun
- Sear the Pork Twice: I learned this the hard way—rushing the sear means greasy, uneven filling. First, cook the ground pork over medium-high heat until it loses its raw color, breaking it into small, uneven pieces. Then, push it to one side of the pan, add 1 tablespoon of oil, and sear those pieces again for 30 seconds. That second crisp gets you the texture you want in every bite.
- Mince Ginger Like Snow: Fresh ginger is non-negotiable, but how you prep it matters. Use a microplane or the finest grater—no, a knife isn’t cutting it here. You want it so fine it almost dissolves into the pork. Too chunky? It’ll sit like little rubber bits in your bao. Trust me, this is the thing that makes the flavor sing.
- Don’t Overmix the Filling: I used to beat the pork mixture like I was kneading dough—big mistake. Overworking it turns the filling dense and chewy. Stir just until the garlic and ginger release their aroma (about 30 seconds), then let the pork cook in its own juices. You’re aiming for a loose, shaggy texture that’ll crisp beautifully when fried.
- Use Cold Bao Dough: Sounds weird, but it works—chill your bao dough for at least 30 minutes before shaping. Warm dough sticks to your hands and expands while frying, making those buns look like sad, lopsided blobs. Cold dough holds its shape, crisps evenly, and gives you that perfect golden crust. (Yes, even if you’re impatient like me.)
Storing and reheating your crispy pork bao bun
Refrigerator Storage
Store leftover bao buns in an airtight container with parchment paper between layers to maintain crispiness. The fried bao will stay fresh in the fridge for up to 3 days, but the filling is best used within 2 days—it loses moisture over time.
I keep the pork filling and fried bao separate until reheating to preserve texture. 🥫
Freezer Preservation
For long-term storage, freeze the fried bao and filling separately. Place fried bao in a single layer on a tray, freeze until solid, then transfer to a freezer bag with parchment between layers.
The filling freezes beautifully for up to 3 months—just thaw in the fridge overnight. When ready to serve, steam from frozen for 8-10 minutes.
Reheating Crispy Bao
To restore that signature crunch, reheat fried bao in a 350°F oven for 5-7 minutes on a wire rack (no direct contact with the pan). For the filling, steam it alone for 3-4 minutes until heated through.
I avoid microwaving—it turns the crust soggy. Pro tip: Brush reheated bao with a little sesame oil to revive crispiness. 🔥
Reviving Soggy Bao
If your bao loses its crunch, don’t toss them! Toss in a hot skillet with 1 tbsp neutral oil for 30 seconds per side until golden again. The filling stays juicy while the crust gets that satisfying crunch back. This trick saves dinner when you’re short on time. 💡
Sauce Storage Tips
Store sweet chili and hoisin sauces in small airtight containers in the fridge for up to 2 weeks. If they thicken, whisk in 1 tsp water to restore consistency.
I keep a small jar on hand—these sauces elevate every bite. For extra flavor, add a pinch of white pepper to reheated sauces. ✨
Make-Ahead Strategy
Prep everything ahead: fry and freeze bao, cook the filling, and mix sauces. On serving day, steam and reheat—no stress! I make a double batch of filling and freeze half, so I always have backup for unexpected guests.
This method cuts active time to just 15 minutes when you’re ready to serve. 💪
Nutrition facts
Frequently asked questions
Can I use ground chicken or turkey instead of pork?
The recipe works best with pork because of its fat content, which keeps the filling juicy during frying. Ground chicken or turkey will work, but add 1 extra tablespoon of oil to the filling and steam for 1-2 minutes longer to prevent dryness. For extra moisture, mix in 1 teaspoon of chicken or turkey stock with the seasonings.
How do I get my bao buns extra crispy?
For maximum crunch, use rice flour instead of cornstarch for the coating—it creates a lighter, crispier crust. Also, fry the bao in 375°F oil for just 45-60 seconds instead of 1-2 minutes, then finish in a 400°F oven for 1-2 minutes to set the crust without overcooking. Work in small batches to maintain oil temperature.
What if my bao dough cracks while frying?
Cracking usually happens when the dough isn't rolled evenly or the oil isn't hot enough. To fix it, chill the dough balls for 30 minutes before frying—this helps them hold shape. If cracks appear, press them gently back together with a fork after frying, then steam as usual. For next time, roll the dough slightly thicker (about 1/4-inch instead of 1/8-inch).
Can I make these bao buns ahead of time?
Fry the bao and fillings separately, then store them in airtight containers in the fridge for 2 days or freeze for 3 months. To serve, steam the filled bao from frozen for 8-10 minutes or reheat fried bao in a 350°F oven for 5 minutes before adding fresh filling. This makes meal prep a breeze!
Why is my pork filling dry after steaming?
Overcooking or overmixing the filling are the most common culprits. Keep the filling barely pink in the center (use a meat thermometer—160°F is perfect) and avoid handling it too much. For extra moisture, add 1 teaspoon of water or broth to the filling mixture. Also, steam immediately after frying to lock in juices.