
Main Courses
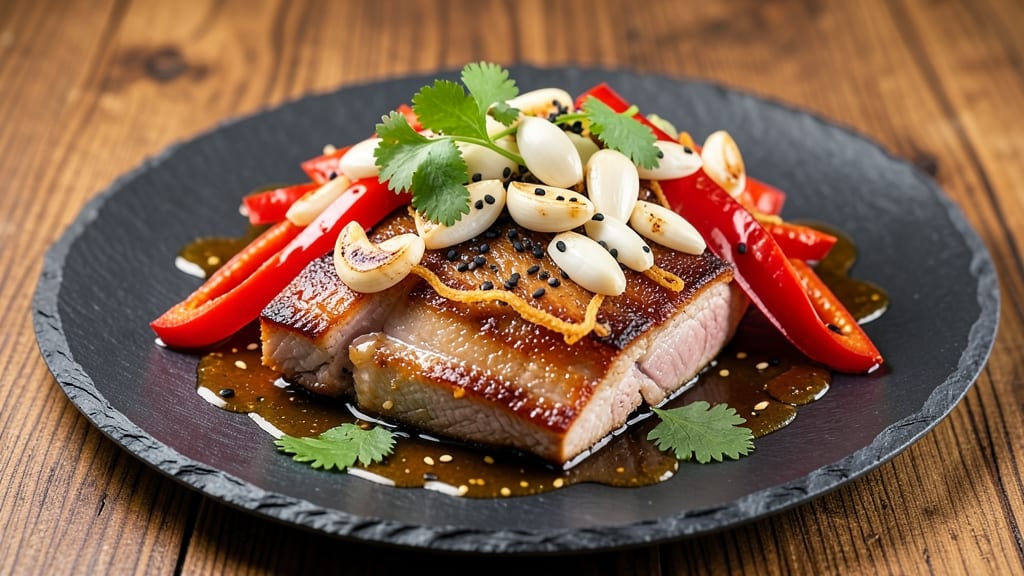
This crispy pork belly stir fry delivers restaurant-quality wok-fired crunch that transforms a simple protein into a showstopper. 🔥 After years of perfecting the technique at The Smoky Pig, I’ve cracked the code for achieving that coveted shatteringly crispy exterior while keeping the interior juicy and tender—no special equipment required.
The secret lies in high-heat searing and a quick marinade that enhances the pork’s natural richness.
The process starts with a simple yet effective marinade of soy sauce, honey, and garlic that tenderizes the pork belly while building deep umami flavor. From there, it’s all about heat control—using a wok or cast iron skillet to render fat and develop that signature crispy bark.
The celery crown garnish adds a fresh, crunchy contrast that elevates every bite, making this dish as visually stunning as it is delicious.
What you’ll end up with is a foolproof stir fry that’s crispy on the outside, melt-in-your-mouth tender on the inside, and packed with savory-sweet flavor. The technique is straightforward, but the results are restaurant-quality—perfect for impressing guests or treating yourself to a weeknight upgrade.
Serve it over steamed jasmine rice or noodles for a complete meal.
This recipe scales beautifully for crowds, and the leftovers reheat just as well as the first serving. Whether you’re a seasoned home cook or new to stir-frying, the step-by-step instructions will guide you through achieving that perfectly crispy texture every time. Let’s get cooking!
Ingredients for crispy pork belly stir fry
Restaurant-quality crunch starts with these 14 ingredients—simple but powerful for that signature crispy pork belly stir fry.
| Ingredient | Amount | Notes |
|---|---|---|
| Pork Belly 🥓 | 1 ½ lb | Skin-on, cut into 1-inch cubes |
| Soy Sauce 🍶 | ½ cup | High-quality, like Kikkoman |
| Honey 🍯 | ¼ cup | Pure, for sweet-savory balance |
| Garlic Cloves 🧄 | 6 cloves | Minced, for aromatic depth |
| Sesame Oil 🫒 | 2 tbsp | Toasted, for nutty aroma |
| Neutral Oil 🫒 | ½ cup | Avocado or vegetable oil |
| Celery Crowns 🥬 | 1 bunch | Fresh, for crispy garnish |
| Green Onions 🧅 | ¼ cup | Sliced, for fresh finish |
| Ginger Root 🌿 | 1 tbsp | Freshly grated, for zing |
| Rice Vinegar 🍶 | 1 tbsp | For brightness, like seasoned |
| Cornstarch 🌾 | 2 tbsp | For crispy coating |
| Salt 🧂 | 1 tsp | Kosher, for seasoning |
| Black Pepper 🌶️ | ½ tsp | Freshly cracked, for heat |
| Jasmine Rice 🍚 | 1 ½ cups | Uncooked, for serving |
The pork belly is where the magic happens. Look for thick-cut, skin-on pieces—the fat renders beautifully for crispiness. Whole Foods or butcher shops often carry the best cuts, but don’t overlook the pre-cut pork belly at Costco if you’re short on time. The skin should be intact and slightly marbled with fat. If you can’t find it fresh, frozen works too—just thaw overnight in the fridge. For extra tenderness, score the fat cap lightly before marinating. The celery crowns? Trader Joe’s has the best pre-cut ones—just rinse and pat dry for garnish.
No soy sauce? Coconut aminos in a pinch, but it’ll taste different. Honey substitutes? Maple syrup or agave work, though honey’s floral notes are ideal. The cornstarch is non-negotiable for crispiness—Bob’s Red Mill is my go-to brand. Swap sesame oil for avocado oil if you’re avoiding sesame, but you’ll lose that nutty aroma. Fresh ginger and garlic? Dried works at half the amount, but fresh is always better. For the rice, jasmine over basmati—it absorbs the stir-fry flavors like a dream. And if you’re feeling fancy, toast the rice in the pan for 30 seconds before adding water for extra nuttiness.
Pork belly keeps 3 days in the fridge, but it’s best used fresh for that crispy texture. The celery crowns? Store wrapped in damp paper towels for up to 5 days—they’ll stay crispier longer. This stir-fry reheats beautifully—just 5 minutes in a skillet over medium heat with a splash of water to revive the crisp. Freeze portions for up to 3 months by wrapping tightly in foil. And here’s a pro tip: Double the batch—leftovers taste even better the next day as the flavors meld.
Why You'll Love This Recipe
- One-Pan Magic: I swear by this for nights when I don’t want to scrub a million dishes—just sear the pork belly until it’s golden and crackling, toss in the garlic and honey-soy glaze, and boom. One sheet pan, one spatula, and you’re done. (Yes, even on a Tuesday night.)
- Sweet-Savory Balance: That honey cutting through the umami of soy sauce? Chef’s kiss. The pork belly stays juicy inside while the edges get gloriously crispy, and the sesame oil finishes it with a nutty aroma that makes the whole kitchen smell like a dim sum dream.
- Leftover Goldmine: Between us, this dish tastes even better the next day—if you can resist eating it all in one sitting. The flavors meld perfectly, and reheating it keeps that crispy texture (just a quick blast in the oven). I’ve packed it for lunches, served it cold in rice bowls, and even turned it into a breakfast scramble. It’s that versatile.
- Budget Luxury: Pork belly feels fancy, but this recipe treats it like a weeknight star. A single slab stretches across two meals—feed the family tonight, reheat the leftovers for tomorrow’s lunch, and still feel like you’re serving something special. Honestly, it’s my secret weapon for making simple meals feel like a splurge.
Step-by-step instructions for wok-fired crispy pork belly
Here's how to achieve that perfect wok-fired crunch with tender pork belly and crispy celery crowns.
🔥 Step 1: Render Fat and Crisp the Pork Belly
Place the 1.5 lb pork belly in a heavy pot or Dutch oven with skin-side down. Cover with cold water and bring to a boil over medium-high heat. Reduce to a simmer and cook uncovered for 45-60 minutes until the fat renders out and the meat is tender but not falling apart. The fat should pool in the pot—this is your gold.
Carefully remove the pork belly and drain it on a rack set over a baking sheet. Let it cool to room temperature, then cut into 1-inch cubes. Here's the thing—don't skip the cooling step. Cold pork belly crisps better than warm.
👨🍳 Step 2: Create the Crispy Cornstarch Coating
In a large bowl, combine the 2 tbsp cornstarch, 1 tsp salt, and 0.5 tsp black pepper. Add the pork belly cubes and toss until evenly coated. Let them sit for 10 minutes—this allows the cornstarch to adhere properly. For extra crunch, I like to add 1 tbsp sesame oil to the mix and toss again.
This coating is what creates that satisfying crunch when we wok-fry. The cornstarch creates a crispy exterior while keeping the inside juicy. Don't rush this step—proper coating means better texture.
🔥 Step 3: Wok-Fry for Perfect Crispiness
Heat a wok or large skillet over high heat until smoking. Add 0.5 cup neutral oil and swirl to coat the bottom. Working in batches (don't overcrowd!), add the pork belly and fry for 2-3 minutes per side until deep golden brown and crispy. You want that fat sizzling and the pork developing a caramelized crust.
Transfer the crispy pork to a paper towel-lined plate to drain excess oil. Here's where patience pays off—if you try to flip too early, you'll get uneven cooking. You'll know it's ready when the edges are crispy and the pork releases easily from the pan.
🍳 Step 4: Build the Sweet-Savory Sauce
In the same wok, reduce heat to medium and add 6 minced garlic cloves and 1 tbsp grated ginger root. Sauté for 30 seconds until fragrant—don't let them burn. Pour in 0.5 cup soy sauce and 0.25 cup honey, then add 1 tbsp rice vinegar. Let it simmer for 2 minutes until slightly thickened.
This sauce should coat the back of a spoon with a glossy sheen. The honey adds that perfect sweet-savory balance that complements the crispy pork. If it's too thick, add a splash of water to loosen it.
🥘 Step 5: Finish with Crispy Celery Crowns
Heat 1 tbsp sesame oil in a clean pan over medium-high heat. Add the celery crowns and fry for 3-4 minutes, turning occasionally, until deep golden brown and crispy. This is your garnish—it adds texture contrast and visual appeal.
Toss the crispy pork belly in the sauce until evenly coated, then transfer to serving plates. Garnish with the crispy celery crowns and sprinkle with 0.25 cup sliced green onions. Serve immediately with 1.5 cups cooked jasmine rice to soak up that delicious sauce.
Pro Tips For Making Crispy Pork Belly Stir Fry
- CRANK THE HEAT: Start your pork belly in a screaming-hot pan—no need to wait for it to warm up. The first few minutes at max heat render the fat fast and lock in that coveted crispy crust, while low heat just makes you wait longer for the same result.
- SCORE THE BELLY: Use a sharp knife to cut shallow crisscross patterns (about ¼-inch deep) on the pork belly before cooking. This lets the fat drain more evenly and creates more surface area for that golden, crackling crust—no soggy pockets here.
- SALT THE BELLY EARLY: Season the pork belly with salt at least 30 minutes before cooking—preferably overnight if you’re patient. The salt breaks down the proteins, helping the fat render cleanly and the skin crisp up like a dream, not a greasy mess.
- SAVE THE RENDERED FAT: Once the pork belly is cooked, don’t dump that golden fat down the drain. Strain it into a jar and use it later for stir-fries, roasting veggies, or even drizzling over noodles—it’s liquid flavor gold, and you’ll regret tossing it.
Common mistakes when making this recipe
Overcrowding the Pan
I’ve seen so many home cooks ruin perfectly good pork belly by overcrowding the pan—this is the #1 mistake that kills crispiness. When you pile too many cubes in the wok, the temperature drops, and the pork steams instead of searing.
The result? Soggy edges and uneven cooking. My rule: Work in batches of no more than 1 cup of pork cubes at a time. A 14-inch cast iron skillet or wok is ideal for this recipe.
If you’re using a smaller pan, cut your pork into even smaller cubes (½-inch instead of 1-inch) to ensure proper browning. 🔥
Skipping the Resting Step
Here’s a big one: Never skip resting the pork belly after rendering. I know it’s tempting to dive right into cutting and cooking, but hot pork belly releases moisture when you cut it, which prevents that crispy crust from forming.
Let it cool to room temperature (about 30 minutes) before cubing. Pro tip: Place it on a rack over a baking sheet to allow air circulation—this dries the surface slightly for better browning. Trust me, this small step makes all the difference.
Using the Wrong Oil
Not all oils are created equal for high-heat cooking. I’ve seen people use olive oil or butter for this stir fry, and let me tell you—it’s a disaster. These oils have low smoke points and burn easily, creating bitter flavors and smoke that can make your pork taste off.
Stick with neutral oils like avocado or vegetable oil (I use Mazola for its high smoke point). For extra flavor without sacrificing crispiness, add 1 tbsp sesame oil at the very end—just don’t use it for frying.
Rushing the Crisping Process
Patience is key when achieving that perfect crispy texture. I’ve seen cooks flip the pork too soon, resulting in pale, undercooked edges. The pork belly needs 2-3 minutes per side over high heat to develop that deep golden-brown crust.
You’ll know it’s ready when the edges are shatteringly crisp and the pork releases easily from the pan. If you’re unsure, cut into a piece—it should be juicy inside with a crispy exterior. Don’t rush it, or you’ll end up with tough, chewy pork.
Ignoring the Cornstarch Coating
The cornstarch coating is non-negotiable for that signature crunch. I’ve had cooks skip it or use too little, and the results are always disappointing. The cornstarch creates a crispy, almost breaded-like texture that contrasts beautifully with the tender pork.
Low and Slow Cooking
This isn’t a low-and-slow BBQ brisket—it’s a high-heat stir fry. Cooking the pork belly over low heat will result in greasy, unappetizing pork that’s far from crispy. You need that wok or skillet smoking hot before adding the oil. If your pan isn’t hot enough, the pork will absorb too much oil and lose its crispiness. Preheat your pan for 3-5 minutes before adding the oil, and listen for that satisfying sizzle when the pork hits the pan—this is your cue that it’s ready. High heat is your friend here!
Nutrition facts
Frequently asked questions
Can I use pork belly with the skin removed for this recipe?
The skin is actually what creates that incredible crispy texture when rendered properly! If you must use skinless pork belly, look for thick-cut pieces with good marbling. The fat is essential for that restaurant-quality crunch—it's what pools in the pan and creates that golden crust. For best results, ask your butcher for skin-on cuts, or use the fat cap from other pork cuts to mimic the texture.
How do I adjust this recipe for a larger crowd?
This recipe scales beautifully! For 8 servings, double all ingredients except the cornstarch coating—use 4 tbsp cornstarch for the same effect. The key is maintaining high heat and working in batches to keep that crispy texture. Use a 16-inch wok or two 14-inch skillets to handle the increased volume. Cook the pork in 2 batches rather than one large crowd, and keep the cooked portions warm in a 200°F oven while finishing the rest.
What's the best way to reheat leftovers without losing crispiness?
Reheating crispy pork belly is tricky, but this method works best: Place leftovers in a 400°F oven for 10-12 minutes on a wire rack over a baking sheet. The heat circulates underneath, restoring that crispy exterior. For extra crunch, broil for 1-2 minutes at the end. Never microwave—it'll make the pork rubbery. If you're short on time, pan-fry in 1 tbsp neutral oil over high heat for 2-3 minutes per side until crispy again.
Can I substitute another protein for the pork belly?
While pork belly is ideal for this technique, you can try duck breast or chicken thighs with skin for similar results. For duck, use the same cornstarch coating but reduce cooking time to 1-2 minutes per side. Chicken thighs need 3-4 minutes per side and benefit from a 30-minute brine in soy sauce and honey before cooking. Avoid lean meats like chicken breast—they won't develop the same crispy texture. The fat content is crucial for that signature crunch!
Why is my pork belly not getting crispy?
This usually happens when the pan isn't hot enough or the pork is too crowded. First, make sure your wok or skillet is smoking hot before adding oil. Work in single layers with space between pieces. If using a non-stick pan, switch to cast iron or stainless steel—these retain heat better. Also, pat the pork cubes very dry before coating with cornstarch. Any moisture will prevent proper browning. For extra insurance, chill the coated pork in the fridge for 15 minutes before frying to help the cornstarch set.